Zoot User Guide
Contents
Introduction
Zoot™ is a highly expressive yet easy-to-play electronic wind instrument that uses the tablet, smartphone, or computer you already own for sound production and to provide powerful features and flexible controls. Zoot responds to the subtleties of breath and articulation, while motion gestures can be used for vibrato, tremolo, octave control, and other effects.
Zoot includes seven ergonomic and reliable touch- and proximity-sensitive finger pads as well as a thumb pad. With standard recorder fingering by default, recorder players can simply pick up Zoot and play. If you’re new to wind instruments, try Zoot’s easy-to-learn simplified fingering system. Or choose whatever fingering system you’re already familiar with — you can even invent your own. Zoot is for everyone who wants to have fun expressing themselves musically!
Features
Hardware
- Seven finger touch / proximity sensors
- Thumb-position sensor
- Breath pressure sensor with option to adjust air resistance
- Accelerometer for sensing instrument motion and orientation in space
- Bluetooth Low Energy (BLE) radio
- Rechargeable lithium-polymer battery that lasts for up to ten hours of operation
- Low-battery detection
- Standard USB-C connector for charging
- Easy power-on and automatic shutoff
- Lightweight (~120 g), small (300 mm x 30 mm x 15 mm), and durable
- Firmware updates via USB-C connector
Zoot Link app
- Compatible with iPhones (iOS 14.0 and above), iPads (iPadOS 14.0 and above), and Macs (macOS 12.3 and above)
- High quality physically modeled clarinet synthesizer
- Bluetooth Low Energy (BLE) connectivity for Zoot sensor data
- Recorder fingering by default, with other fingering systems selectable
- Touch display to show finger positions
- Finger-controlled pitch bends by “leaking” or “shading” finger sensors
- Motion gestures for vibrato, tremolo, octave control, and more
- Multiple options for easily setting base pitch and transposition of instrument
- Chord strummer using motion gestures only
- Named presets for saving and restoring all app controls
- MIDI output to control other virtual wind instruments
- MIDI input to play Zoot’s virtual clarinet using a different controller
- Built-in display of currently active fingerings for easy reference
- Live graphs of raw pressure, MIDI breath, and MIDI bend outputs
- Sip (suction) sensor for triggering user-defined actions or MIDI messages
- Sine wave synthesizer with adjustable skew
- Proximity and Tilt modes for theremin-like effects
- Graphical breath mapping curve for customized control
Getting to know Zoot
To get started, take out your Zoot and get to know its parts as shown in the photos. (If you’re reading this guide online, tap or click the images for a better view.)

On the top side, you can see the spaces (“finger wells”) where your fingers fit to activate the touch sensors. As on a recorder, three fingers of your left hand are placed closer to the mouthpiece with the four fingers of your right hand placed further away. Notice how the layout of the finger wells makes this placement clear.
The two brass power-on screws in the center of the instrument are connected electrically. Placing a finger or thumb across them — and/or across the matching screws on the bottom — turns on Zoot’s electronics.
The mouthpiece is a simple, smooth tube; blowing into it results in an increase in air pressure that is measured by the internal sensor.
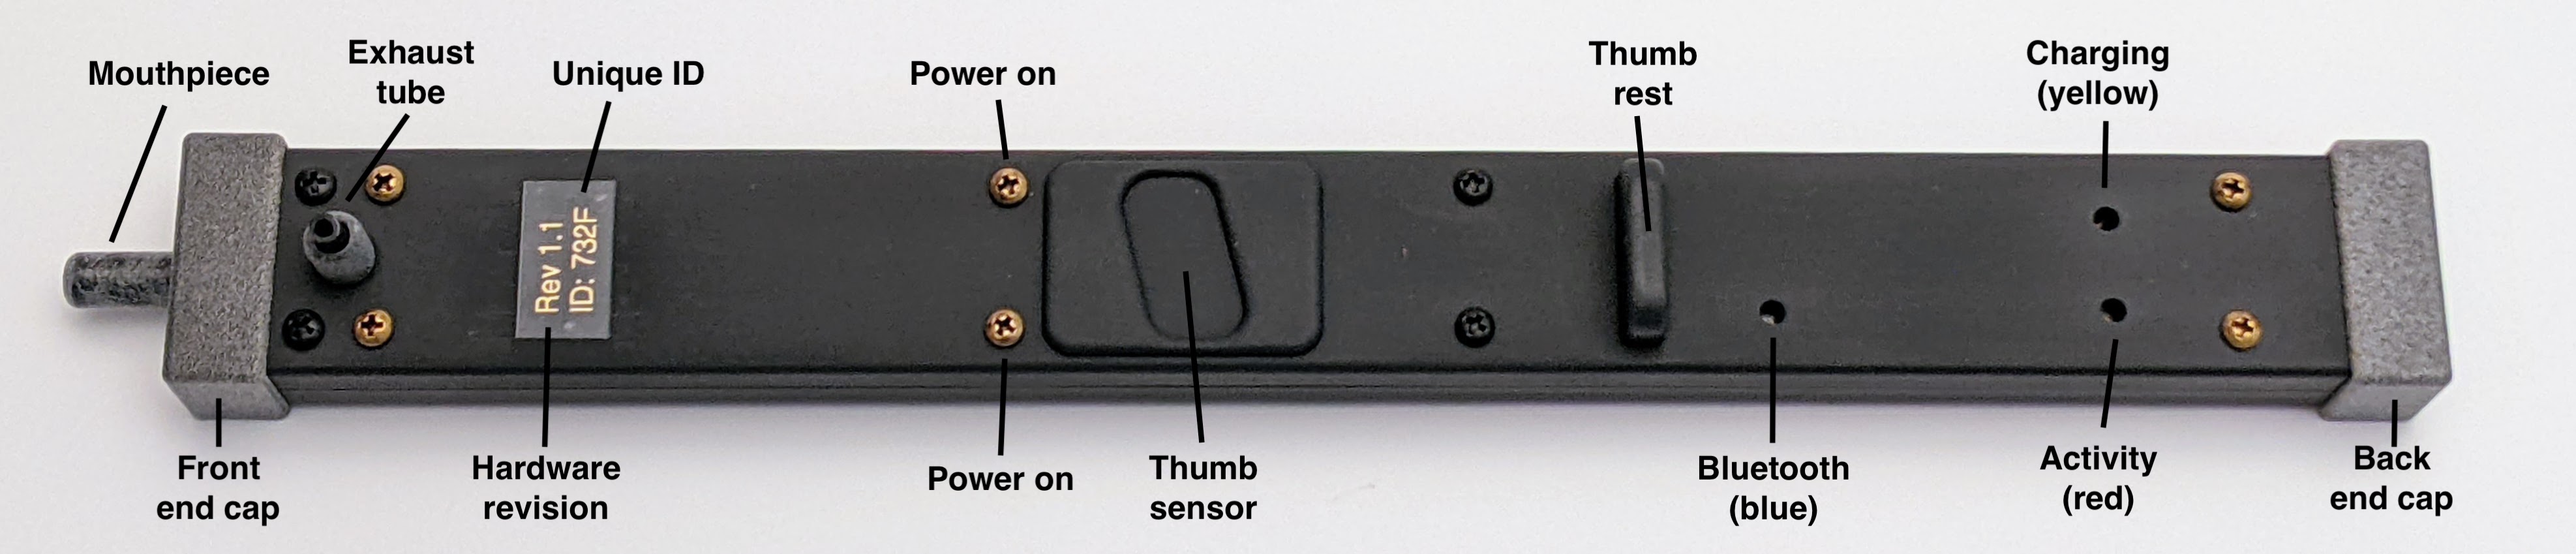
On the underside of Zoot, you can see the exhaust tube where your breath (and any liquid condensation) leaves the instrument. This has a fixed part that is part of the mouthpiece and a removable resistance tube. The resistance tube can be modified or replaced to tune the breath resistance according to an individual player’s needs.
A label shows Zoot’s hardware revision level and its unique identifier.
The power-on screws on the underside match those on the top side.
The thumb rest supports the instrument on your right thumb.
There are three LED indicators visible through holes on the underside of Zoot. The blue LED indicates Bluetooth status:
- A short blue flash and long pause mean that Zoot is not connected to your smart device or not yet paired with it.
- A long blue flash and short pause mean that Zoot is paired with your smart device and communicating with it but not yet connected to Zoot Link.
- A solid blue light means that Zoot is connected to the app and sending data.
The red LED flashes to indicate that the internal microcontroller is turned on and working. This is also used to show status during firmware updates.
The yellow LED turns on when you plug in USB-C power to charge Zoot’s internal battery. When the battery is fully charged, the yellow LED turns off.
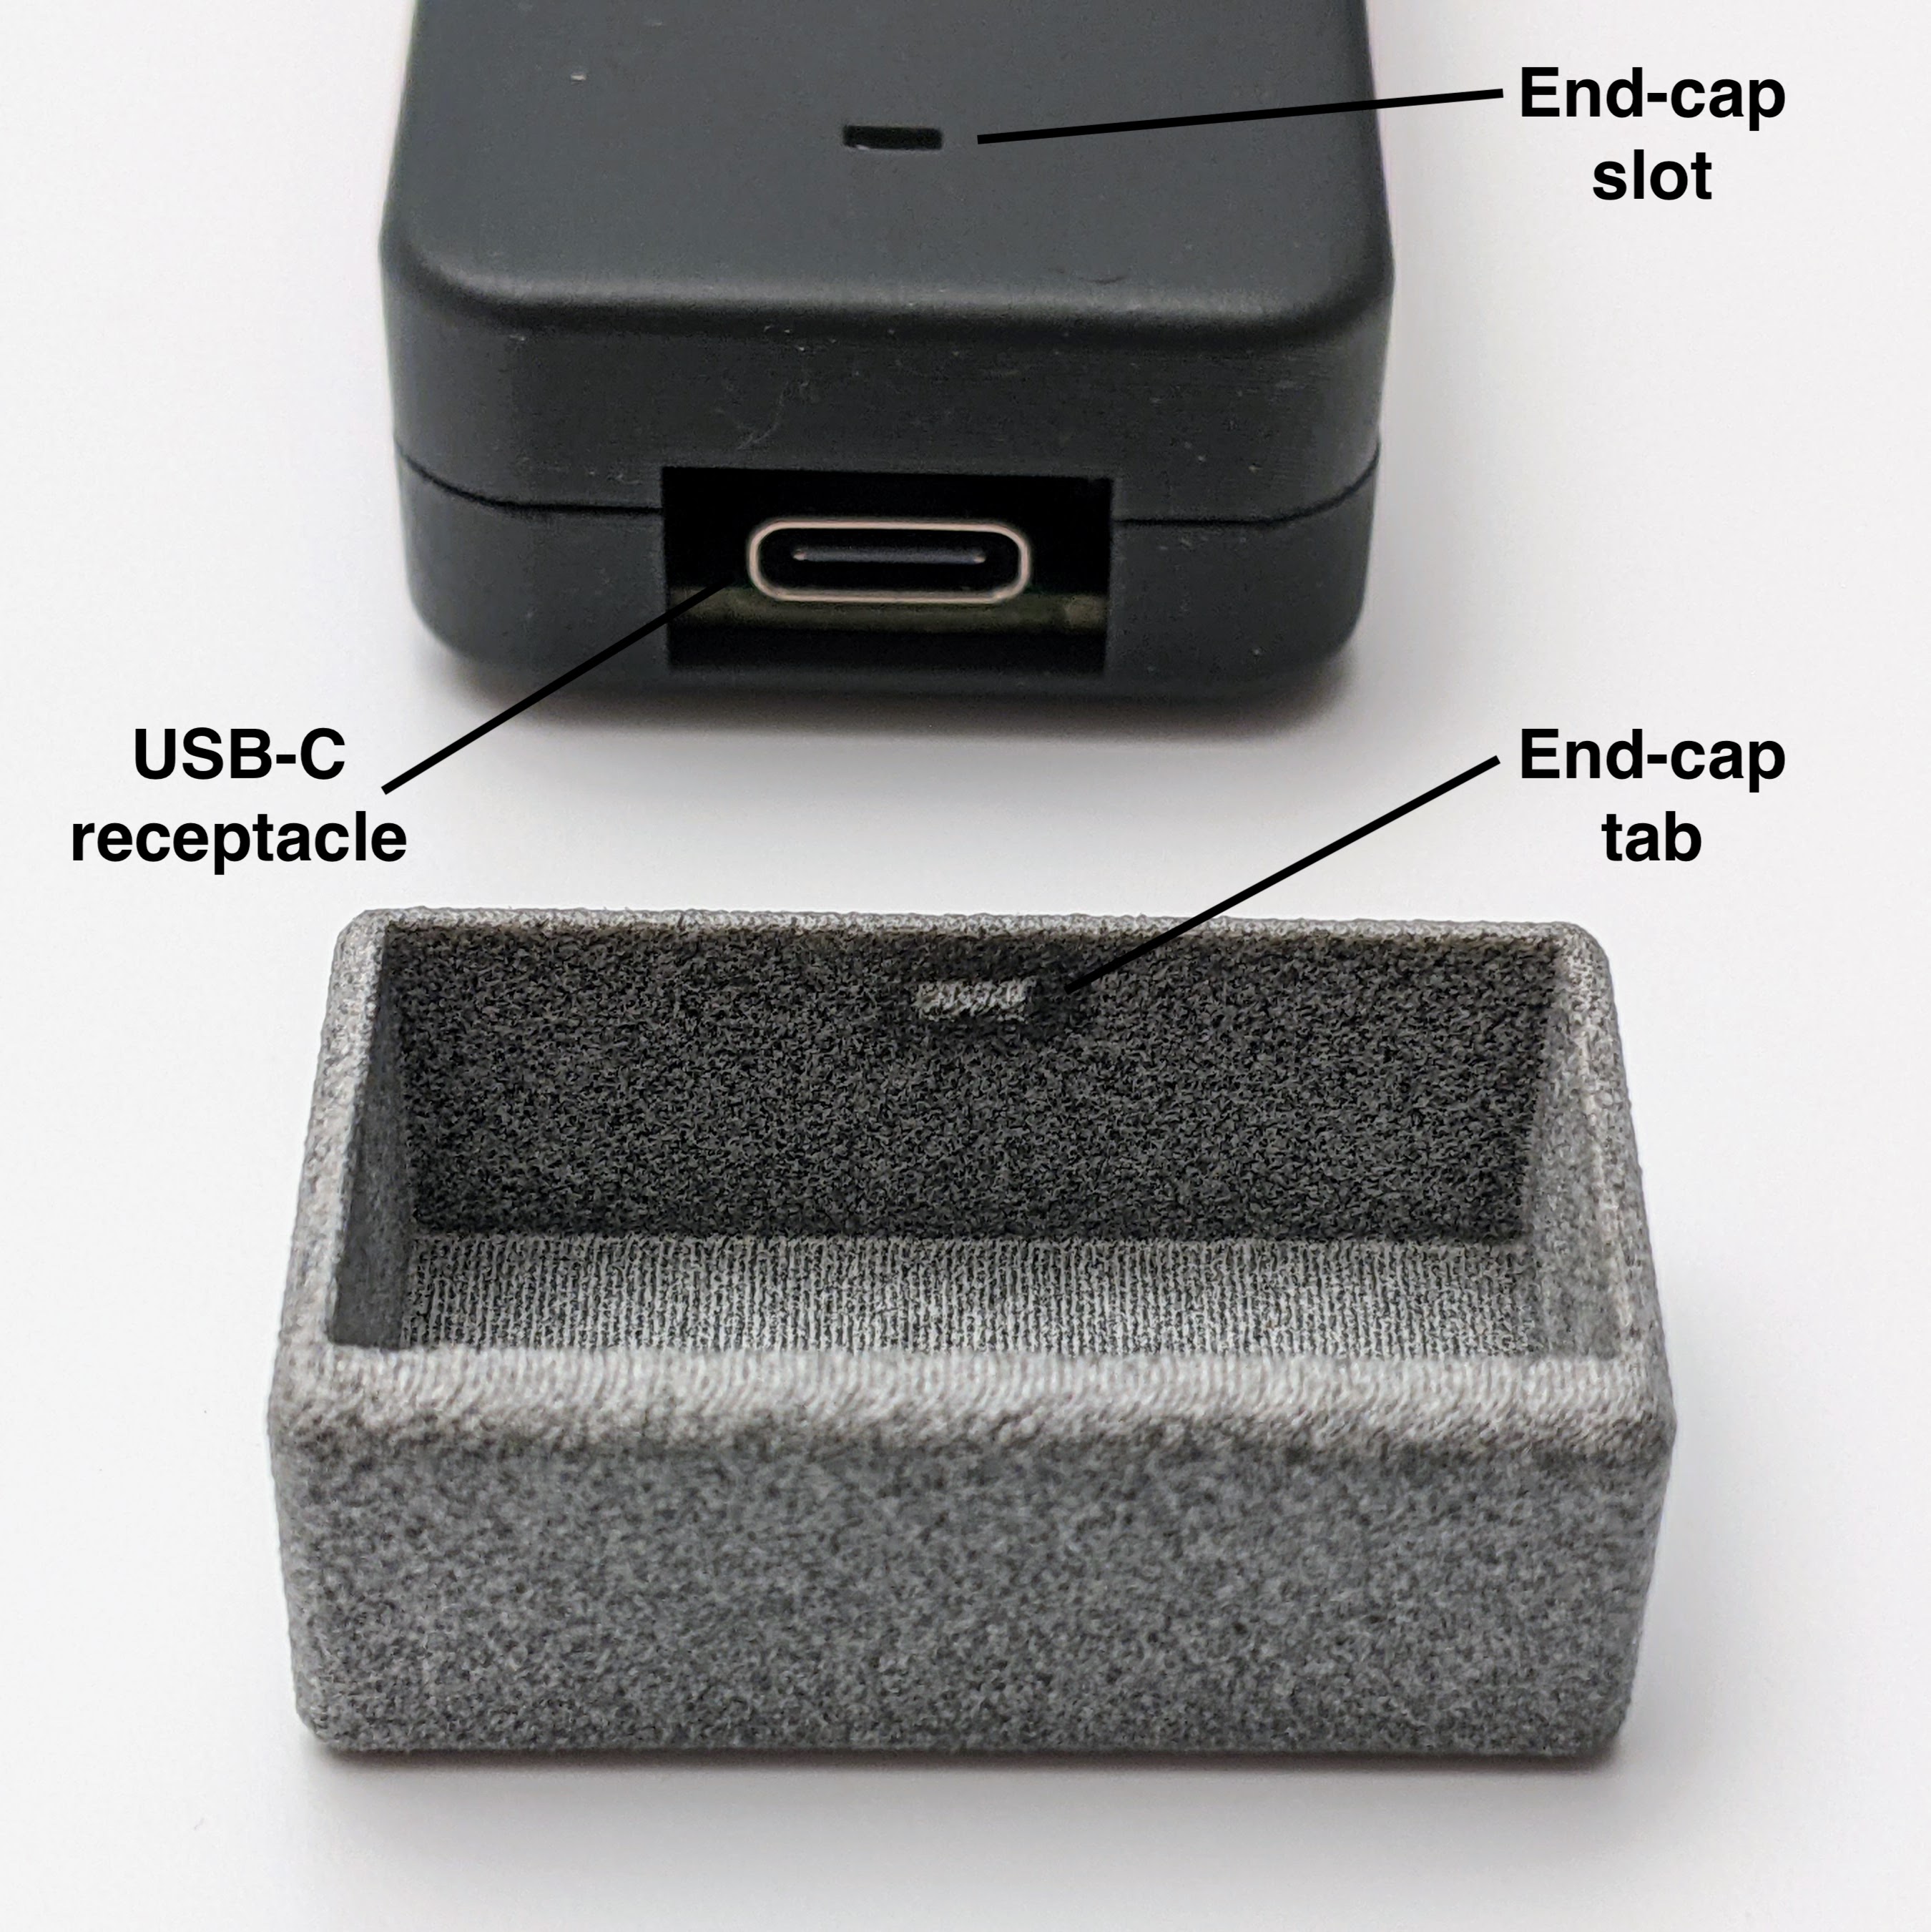
Removing the back end cap gives you access to the USB-C receptacle for charging Zoot’s internal battery or updating Zoot’s firmware. Note that the end cap is asymmetrical and includes a tab that snaps into a slot on the underside of Zoot.
Zoot Link
Zoot Link provides the interface between the Zoot hardware and the sound-production software that runs on your smart device, including the app’s own high quality, physically modeled clarinet. The app receives sensor information from the Zoot instrument via Bluetooth Low Energy (BLE), and controls the built-in virtual clarinet directly or sends MIDI commands to a separate external synthesizer.
For iOS or iPadOS, install Zoot Link from the App Store. If you want to use Zoot with a MacBook, please download the macOS app from the Downloads page of the Zoot website. The screenshots and detailed descriptions in the online guide refer to the latest available version of the app.
To play Zoot, you connect it via Bluetooth to your iPhone, iPad, or MacBook, and run Zoot Link. The Zoot hardware sends its sensor values (breath pressure, finger positions, instrument orientation and acceleration) to the app, which interprets the data to produce sound. The app has many features that control how those sensor values map to musical sounds, but many users will be happy with the default settings.
When you open Zoot Link for the first time, a system message will pop up requesting permission to use Bluetooth. Tap (or click) “OK” to allow this. (You can play the app’s virtual clarinet via MIDI input without Bluetooth, and you can also change the app’s permissions later in the system’s Settings.)
The current version of Zoot Link is intended for use on a device in portrait orientation. In landscape orientation, you may have to scroll to see all the controls.
When Zoot Link is updated, the app will show “Release Notes” briefly describing the changes at startup. Uncheck the Show at Startup box if you don’t want to see these notes again. The app’s complete version history can be found on the Zoot website.
Playing Zoot
Powering on
Turn on your Zoot by touching the brass screws (power on) in the center of the instrument. You can touch the two screws on Zoot’s top side, the two screws on its underside, or all four at once. You’ll know that Zoot is on when you see the blue and red LEDs on Zoot’s underside light up.
Pairing Bluetooth
To use Zoot with its app for the first time, you have to pair it with your smart device. Turn on Bluetooth and open the Bluetooth settings. You should see “Zoot XXXX” show up in “Other Devices” or “Nearby Devices,” where “XXXX” represents your Zoot’s unique identifier (shown on the label on Zoot’s underside). Select your Zoot and accept the request to pair it with your phone, tablet, or computer.
Once Zoot has been paired with your smart device, Zoot Link will automatically connect to your Zoot. In the Status section, the BLE indicator shows if Bluetooth Low Energy data is being received, and the CAL indicator shows whether Zoot has completed a calibration cycle. You don’t need to interact with the app at all to start playing.
Placing fingers
Hold Zoot the way you would a soprano recorder. Start with the middle, ring, and index fingers of the left hand placed on the left-hand sensors, the thumb of the left hand covering both halves of the thumb sensor, the index, middle, ring, and pinky fingers covering the right-hand sensors, and your right thumb under the the thumb rest to support the instrument. You should see corresponding blue and red dots appear on the app’s Touch Display.
If you don’t see all the finger sensors lighting up on the Touch Display, either your fingers aren’t covering the sensors sufficiently, or you were touching one or more sensors during the calibration cycle. You can always force a calibration by pressing the Calibrate button in the app. Hold Zoot by its edges when you calibrate (or when you turn it on) so your fingers are not touching any of the sensors.
Blowing notes
Blow into the mouthpiece to play a note on the built-in virtual clarinet. As you vary your breath pressure, notice how the sound changes in both loudness and timbre.
Choosing a fingering system
By default, Zoot uses baroque recorder fingerings, but you can select other options, including Simple (Four Octaves) on the Gestures screen. You can always access Active Fingerings from the bars menu at the top left of the screen.
To create your own custom fingering system, follow the instructions in Guide to Custom Fingerings.
Using your left thumb
The thumb sensor consists of two halves. By bending your thumb joint, you can cover both halves (like covering the thumb hole on a recorder), only the left half (like the half-hole position on a recorder), or only the right half. You can also lift your thumb off the sensor entirely.
Here is how those positions apply to the Simple (Four Octaves) fingering system:
- thumb covers both halves of sensor → first (lowest) octave
- thumb covers left half of sensor → second octave
- thumb sensor uncovered → third octave
- thumb covers right half of sensor → fourth octave
Connecting audio output
You can use Zoot with your smart device’s built-in speaker, with headphones or earbuds, or with an external speaker. Be aware that external wireless Bluetooth speakers introduce a significant audio delay, and are not suitable for playing Zoot. (Even Bluetooth speakers that provide a wired auxiliary input may introduce delay due to their internal signal processing.) For Zoot’s clarinet, we recommend using an amplified speaker intended for live sound production, like the LEKATO 5W Mini Guitar Amp.
Zoot Link in detail
Zoot Link offers three main categories of settings, Basics, Gestures, and Strummer, which you select with navigation buttons at the top of the screen. The currently selected category is indicated by a white outline highlighting its navigation button.
You can also tap or click the Zoot logo to return to the Basics page.
The bars menu at the top left of the screen provides access to additional information and settings.
The following sections explain all the settings and information displays available in the app, but you don’t need to go beyond the Basics screen to enjoy playing Zoot.
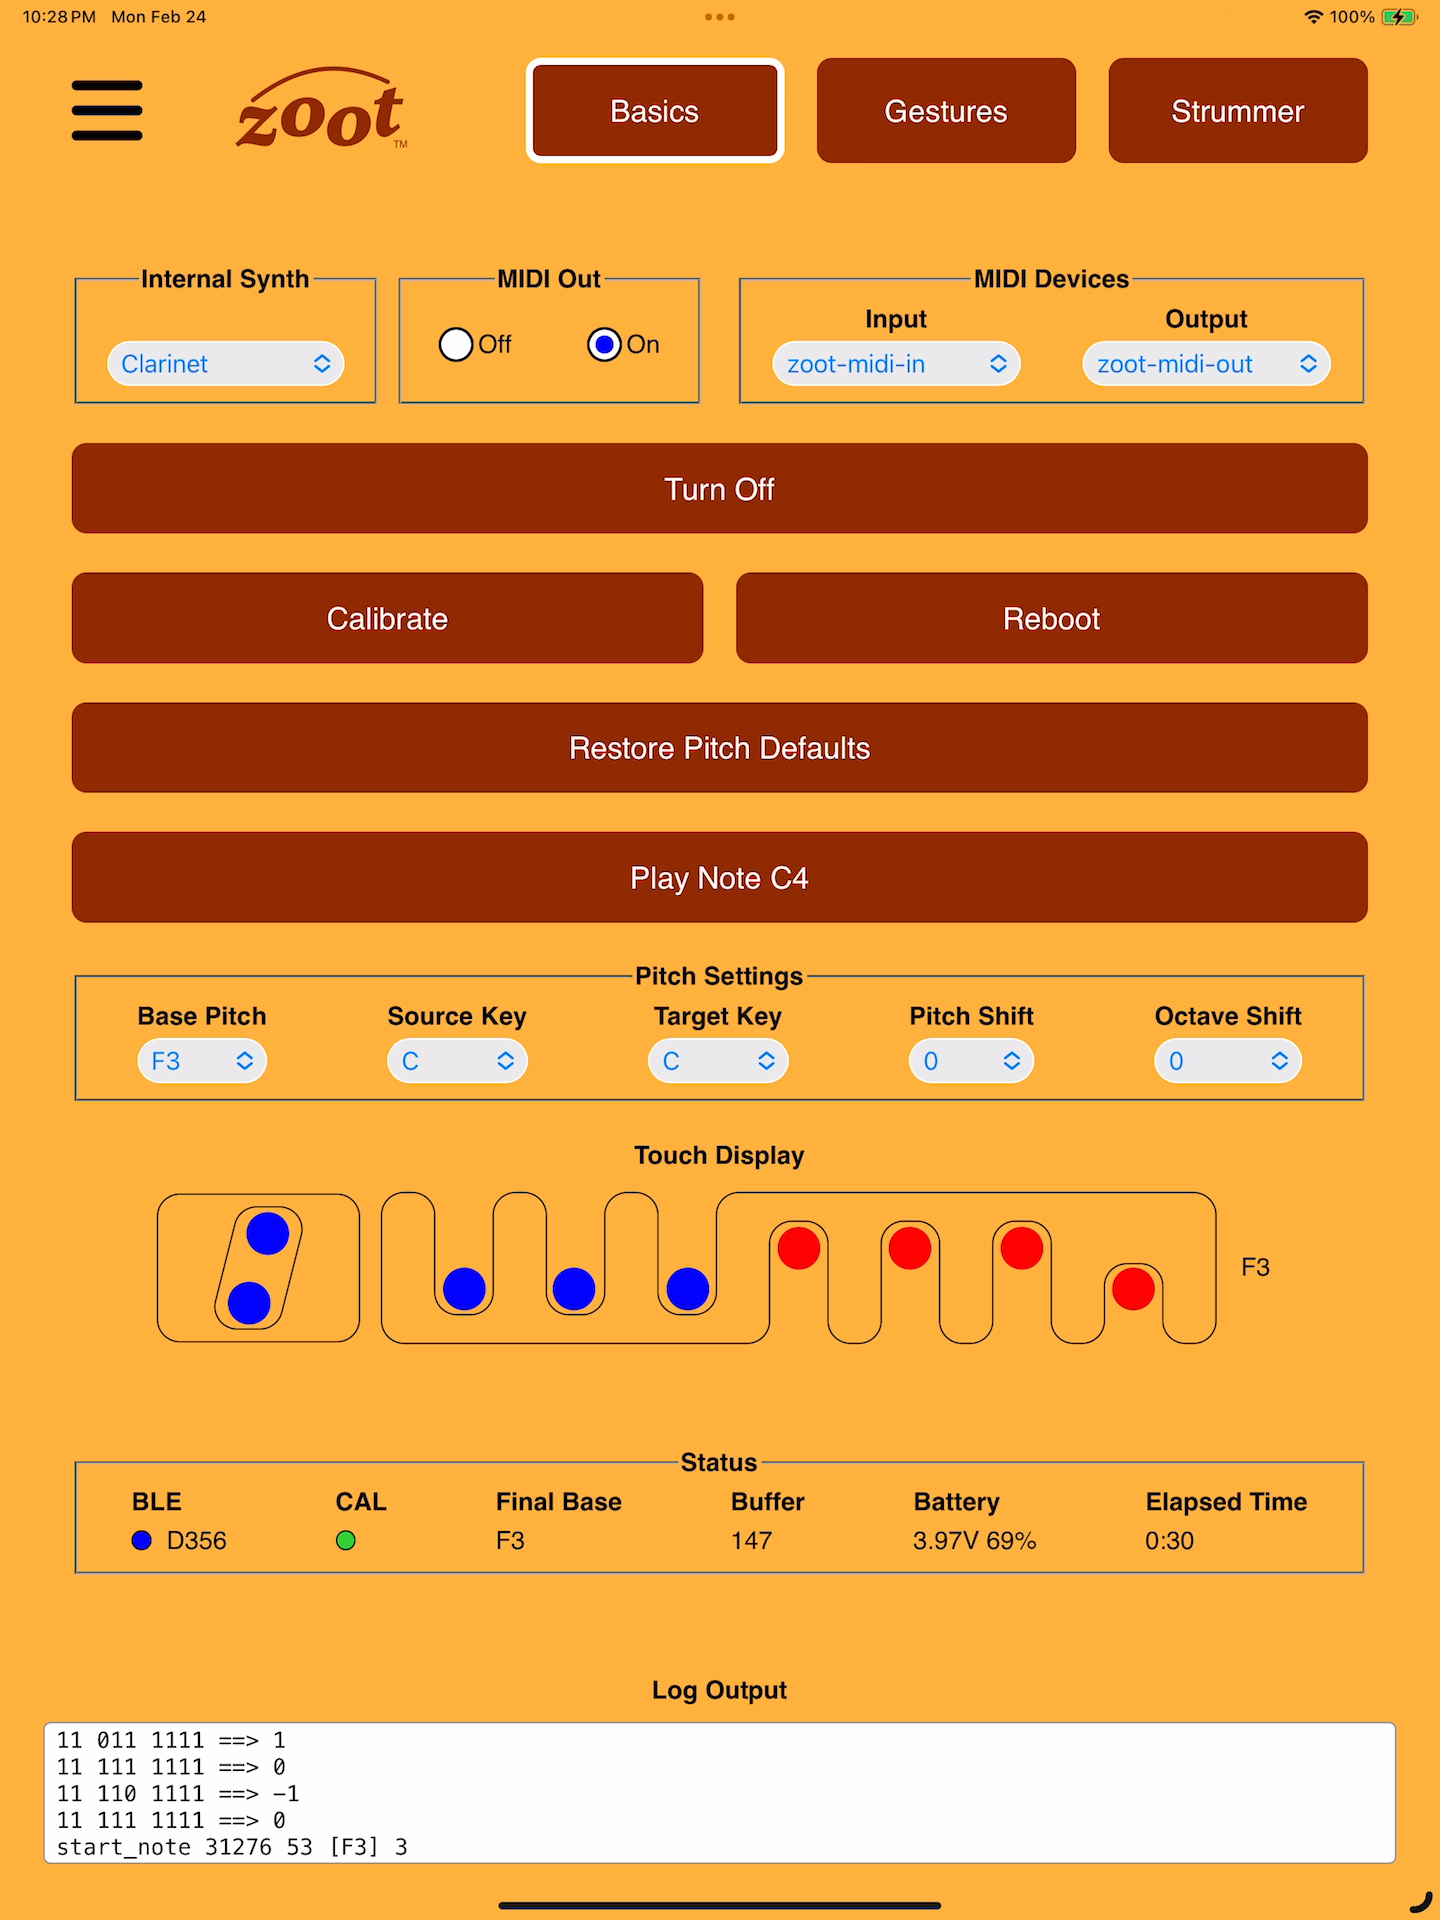
Basics
When it starts up, the app will automatically try to connect via Bluetooth (BLE) to a Zoot instrument that you have previously paired with your iPad, iPhone, or MacBook. You don’t need to interact with the app at all to start playing.
Internal Synth lets you run Zoot Link’s built-in physically modeled Clarinet or a Sine generator with adjustable skew to produce audio output from the app. When you select None, the app itself is silent.
When MIDI Out is on, Zoot Link sends its output to the selected MIDI device in addition to playing its internal synth (if one is selected).
In other words, you can play one of the internal synths only, send MIDI output only, or do both concurrently (to record your clarinet performance as MIDI data, for example).
The MIDI Devices section lets you select an external MIDI source for input to one of Zoot’s built-in synths or a MIDI destination for output generated by playing the instrument. By default, Zoot Link understands and produces these MIDI messages:
- Note On
- Note Off
- Control Change: Breath
- Pitch Bend
For more control over the messages that Zoot Link sends to its MIDI output, see the MIDI Settings described below.
Zoot turns off automatically if it sits still for two minutes, if you hold it vertically with the mouthpiece facing down for two seconds, or, if Zoot is connected to Zoot Link, when you press Turn Off. The app will reconnect as soon as you turn the instrument back on.
Calibrate forces a manual recalibration of the finger sensors. Hold Zoot by its edges when you calibrate (or when you turn the instrument on) so your fingers are not touching any of the sensors.
Reboot forces the firmware to reboot and reestablish the BLE connection without turning off.
Restore Defaults sets Base Pitch to F3 with no additional transposition (see Pitch Settings, below).
Play Note plays a test note for convenience in checking your audio system, typically a simple amplified speaker.
The group of controls labeled Pitch Settings lets you take advantage of an electronic instrument’s ability to map fingerings to pitches arbitrarily. Since Zoot’s default fingering is recorder based, Base Pitch allows you to use F fingering, like an alto or bass recorder, or C fingering, like a tenor or soprano recorder.
With Source Key to specify the key in which the music is written and Target Key to specify the key that you want to play in, you can set the instrument’s transposition without having to figure out the required pitch shift (number of semitones) in your head.
Pitch Shift functions like a guitar capo, except that you can shift the pitch up or down by up to 12 semitones.
Octave Shift lets you shift the pitch up or down by up to 2 octaves.
Touch Display shows you which fingers the sensors see as “touching.” The fingers and thumb of the left hand are shown in blue, and the fingers of the right hand in red. The actual output pitch (including transpositions) is shown to the right.
Status
The BLE dot blinks blue when the app is connected and receiving sensor data. The four-character code to the right of the BLE dot is your Zoot’s unique identifier.
The CAL dot turns red during calibration and green when a calibration cycle has been completed. The app does not currently detect “bad” calibrations that can occur if you have your fingers on or close to the touch sensors during the calibration cycle.
Final Base tells you the actual output pitch output (including transpositions), for the all-fingers-down note in standard fingering systems.
Buffer indicates the size of the audio output buffer. The app is designed to buffer 128 samples (2.9 ms of latency), but if other iOS audio apps are running, the buffer size can be much larger. To minimize latency, close any audio apps that cause the buffer to grow much larger than 128. If you need a second audio app to run concurrently, because it’s a synthesizer you want to control with Zoot Link, for example, you can start the second audio app before starting Zoot Link to get the smallest buffer size.
Battery reports the measured voltage of Zoot’s battery and an estimate of the percent of charge remaining.
Elapsed Time reports how long Zoot Link has been running.
On large iPads and on MacBooks, internal information is displayed in the Log Output section.
Gestures
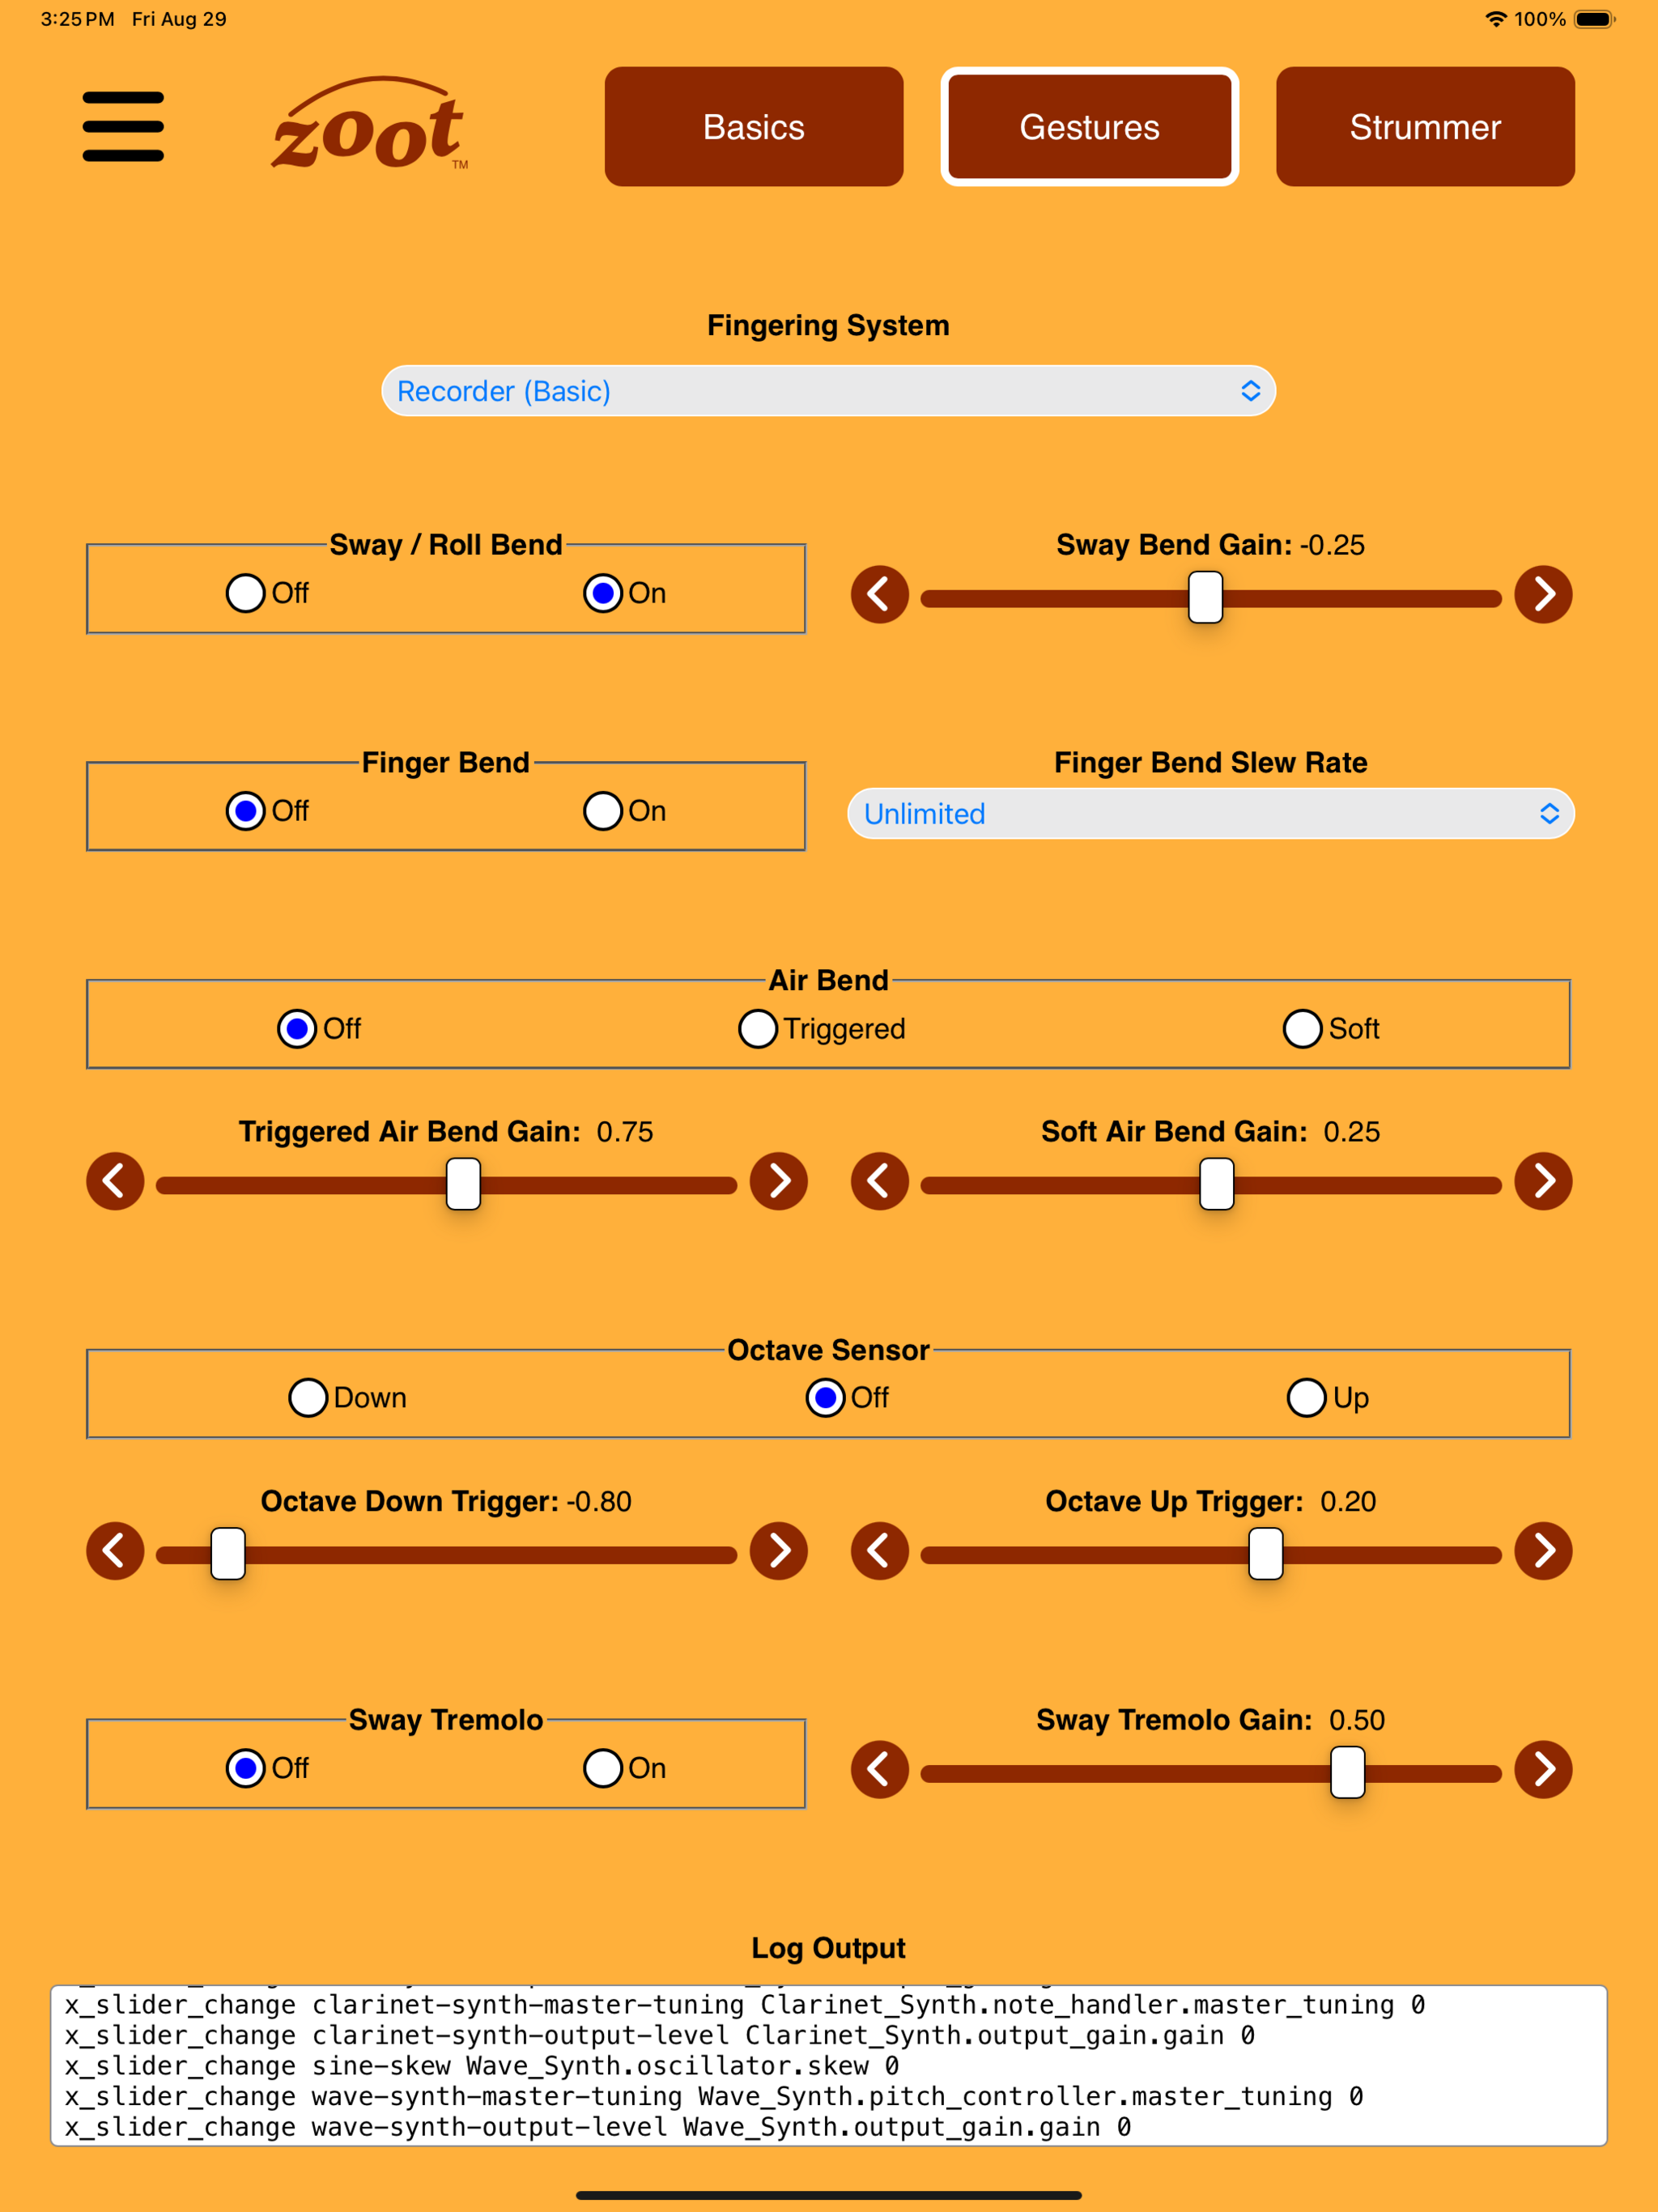
Fingering System determines the mapping of finger positions to pitches. Several fingering systems are built into the app, with more to come in future updates. You can always check on fingerings for the currently active system by selecting Active Fingerings from the bars menu. You can also define your own custom fingering system; please see the Guide to Custom Fingerings and User-Submitted Fingering Systems.
When Sway / Roll Bend is on, you can bend the output pitch by swaying the instrument side to side (acceleration) to produce vibrato or by rolling the instrument around its long axis (orientation). Adjust the degree of pitch change introduced with Sway Bend Gain.
When Finger Bend is on, lifting a finger slightly from its sensing pad (usually the one furthest from the mouthpiece) will raise the pitch. This mimics what happens when you “leak” a tone hole on a tin whistle or recorder. Similarly, you can lower the pitch by bringing a finger near to an open sensing pad without fully touching it. This mimics what happens when you “shade” a tone hole on a tin whistle or recorder. With this capability you can slide from one pitch to another (portamento). Please note that this feature interacts with the chosen fingering system and the MIDI Pitch Bend Range. Please see below for details.
It takes a little practice to make finger bends work well; check out some of our video demos for examples, and please don’t hesitate contact us if you have questions or comments.
Finger Bend Slew Rate allows you to limit the rate of change of the MIDI pitch bend output (for finger bends only). Normally, you use the default setting of Unlimited. On some external MIDI instruments, you might hear spurious clicks on some note transitions. These artifacts can be mitigated by limiting the maximum slew rate. (The selectable values are in units of semitones per second. Please contact technical support for more details.)
When Air Bend is set to Triggered, exceeding the maximum breath pressure triggers “air bend,” causing breath pressure to affect the output pitch for the duration of the current note, enabling one kind of klezmer-like ornament. The size of this effect is adjusted by Triggered Air Bend Gain.
When Air Bend is set to Soft, breath pressure affects the output pitch all the time (as on a recorder). The size of this effect is adjusted by Soft Air Bend Gain.
Note that Air Bend settings are somewhat experimental, and may be modified in future versions of the app. Go ahead and experiment, and let us know what you think!
In standard fingering systems, you control the octave using the position of your left thumb. However, you can also enable an Octave Sensor that responds to the angle at which you hold the instrument. If the Octave Sensor is set to Up, tilting the Zoot up beyond the Octave Up Trigger threshold causes all notes to be transposed an octave higher until the Zoot is tilted below the Octave Down threshold. If the Octave Sensor is set to Down, then tilting the Zoot down below the Octave Down Trigger threshold causes all notes to be transposed an octave lower until the Zoot is tilted above the Octave Up threshold.
The difference between the up and down triggers allows you to use a normal playing position; you only need to tilt Zoot beyond the relevant threshold to change the octave.
When Sway Tremolo is on, you can vary the breath value (usually affecting the output amplitude) by swaying the instrument side to side (acceleration) or by rolling the instrument around its long axis (orientation). Adjust the degree of breath variation with Sway Tremolo Gain. You might use this feature to imitate the tremolo effect that an acoustic harmonica player achieves by covering and uncovering the instrument with their hand. Sway tremolo may be easier for some people than varying the actual pressure of their breath. (The effective breath value is the sum of breath pressure and tremolo effect.) Note that Sway Tremolo can be combined with Sway Bend: the two are not mutually exclusive.
Strummer
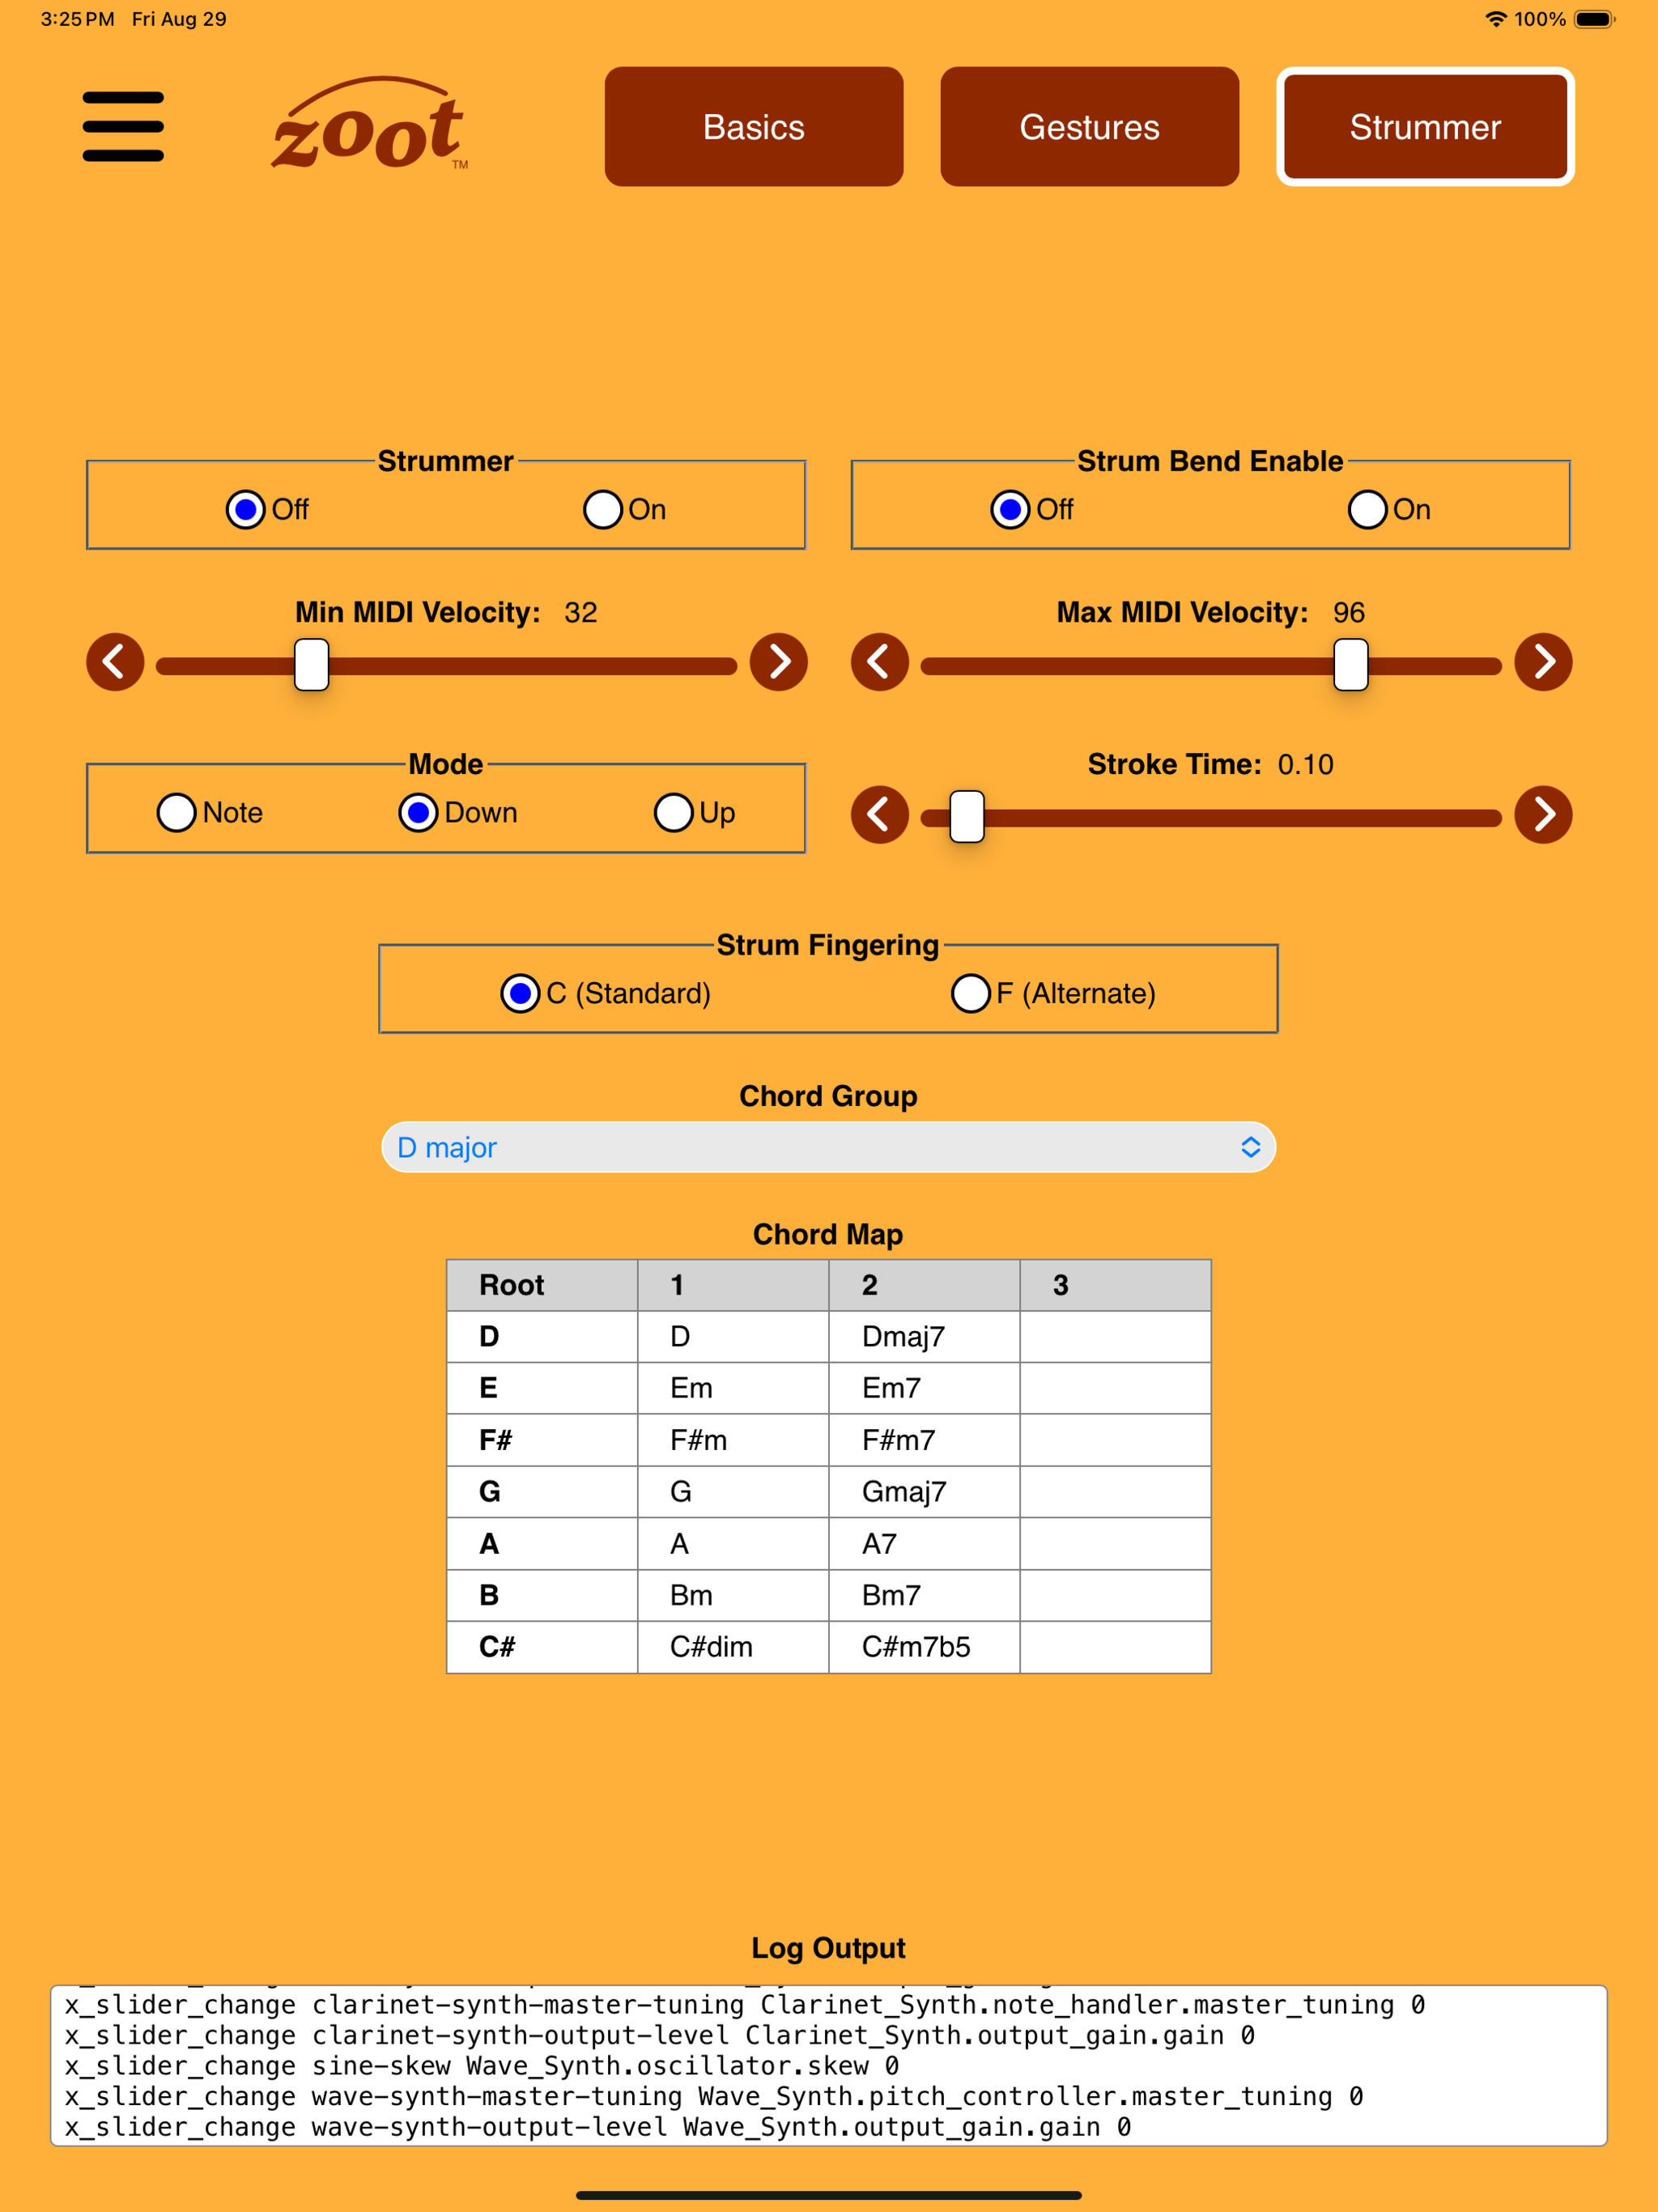
Zoot’s Strummer lets you accompany yourself singing by shaking the instrument to “strum” chords. When the strummer is turned on, a change in acceleration along the instrument’s main axis (surge motion) triggers the “strumming” of a chord on an external MIDI guitar (or other polyphonic virtual instrument). You specify which chord to play by the note fingered. The pitch class (e.g., F#) determines the root of the chord, and the note’s octave determines the particular type of chord (e.g., m7). The exact mapping of notes to chords depends on the selected Chord Group. See one of the video demos to get a better sense of what the motion looks like.
Zoot Link includes the chords commonly used in six major and minor keys. You can also define your own chords and chord groups by editing specially formatted text files that Zoot Link can load. Please contact us for detailed instructions.
Strum Bend Enable determines whether a sway motion (as for vibrato) gets applied to the strummer’s output. When it’s turned on, you get the effect of a guitar whammy bar.
The intensity of your strum motion determines the intensity of the notes in the strum — the MIDI velocity values sent to the external synth. You can adjust the minimum and maximum values to suit your taste and the response of the synth you use for strumming.
Mode determines the sequence of notes in the strum. When Down is selected (the default), the notes of the chord are played from lowest pitch to highest pitch, like a down strum on a guitar. Up selects the opposite effect. If you select Note, then the output of the strummer is a single note, that of the note fingered when you trigger the strum.
Stroke Time sets the total time for the strum in seconds. Large values create an arpeggio effect.
By default, the strummer interprets the note fingered as if for a C instrument, regardless of how you set the Base Pitch in the basic settings. Setting Strum Fingering to F tells the strummer to interpret the note fingered as if for an F instrument.
Bars menu

The bars icon (sometimes called a “hamburger”) at the top left of the screen gives you access to the bars menu, which slides in from the left. This has two sections: Info, which includes four screens of mostly read-only information and Settings, which includes four screens of additional settings. The following sections describe each item in turn.
Help
The Help screen provides some basic information and a link to the Zoot website where you can find the complete user guide, video tutorials, and so on.
About
The About screen shows the version number and date tag for Zoot Link. If a Zoot has been connected, it will also show the version and date tag for Zoot’s firmware.
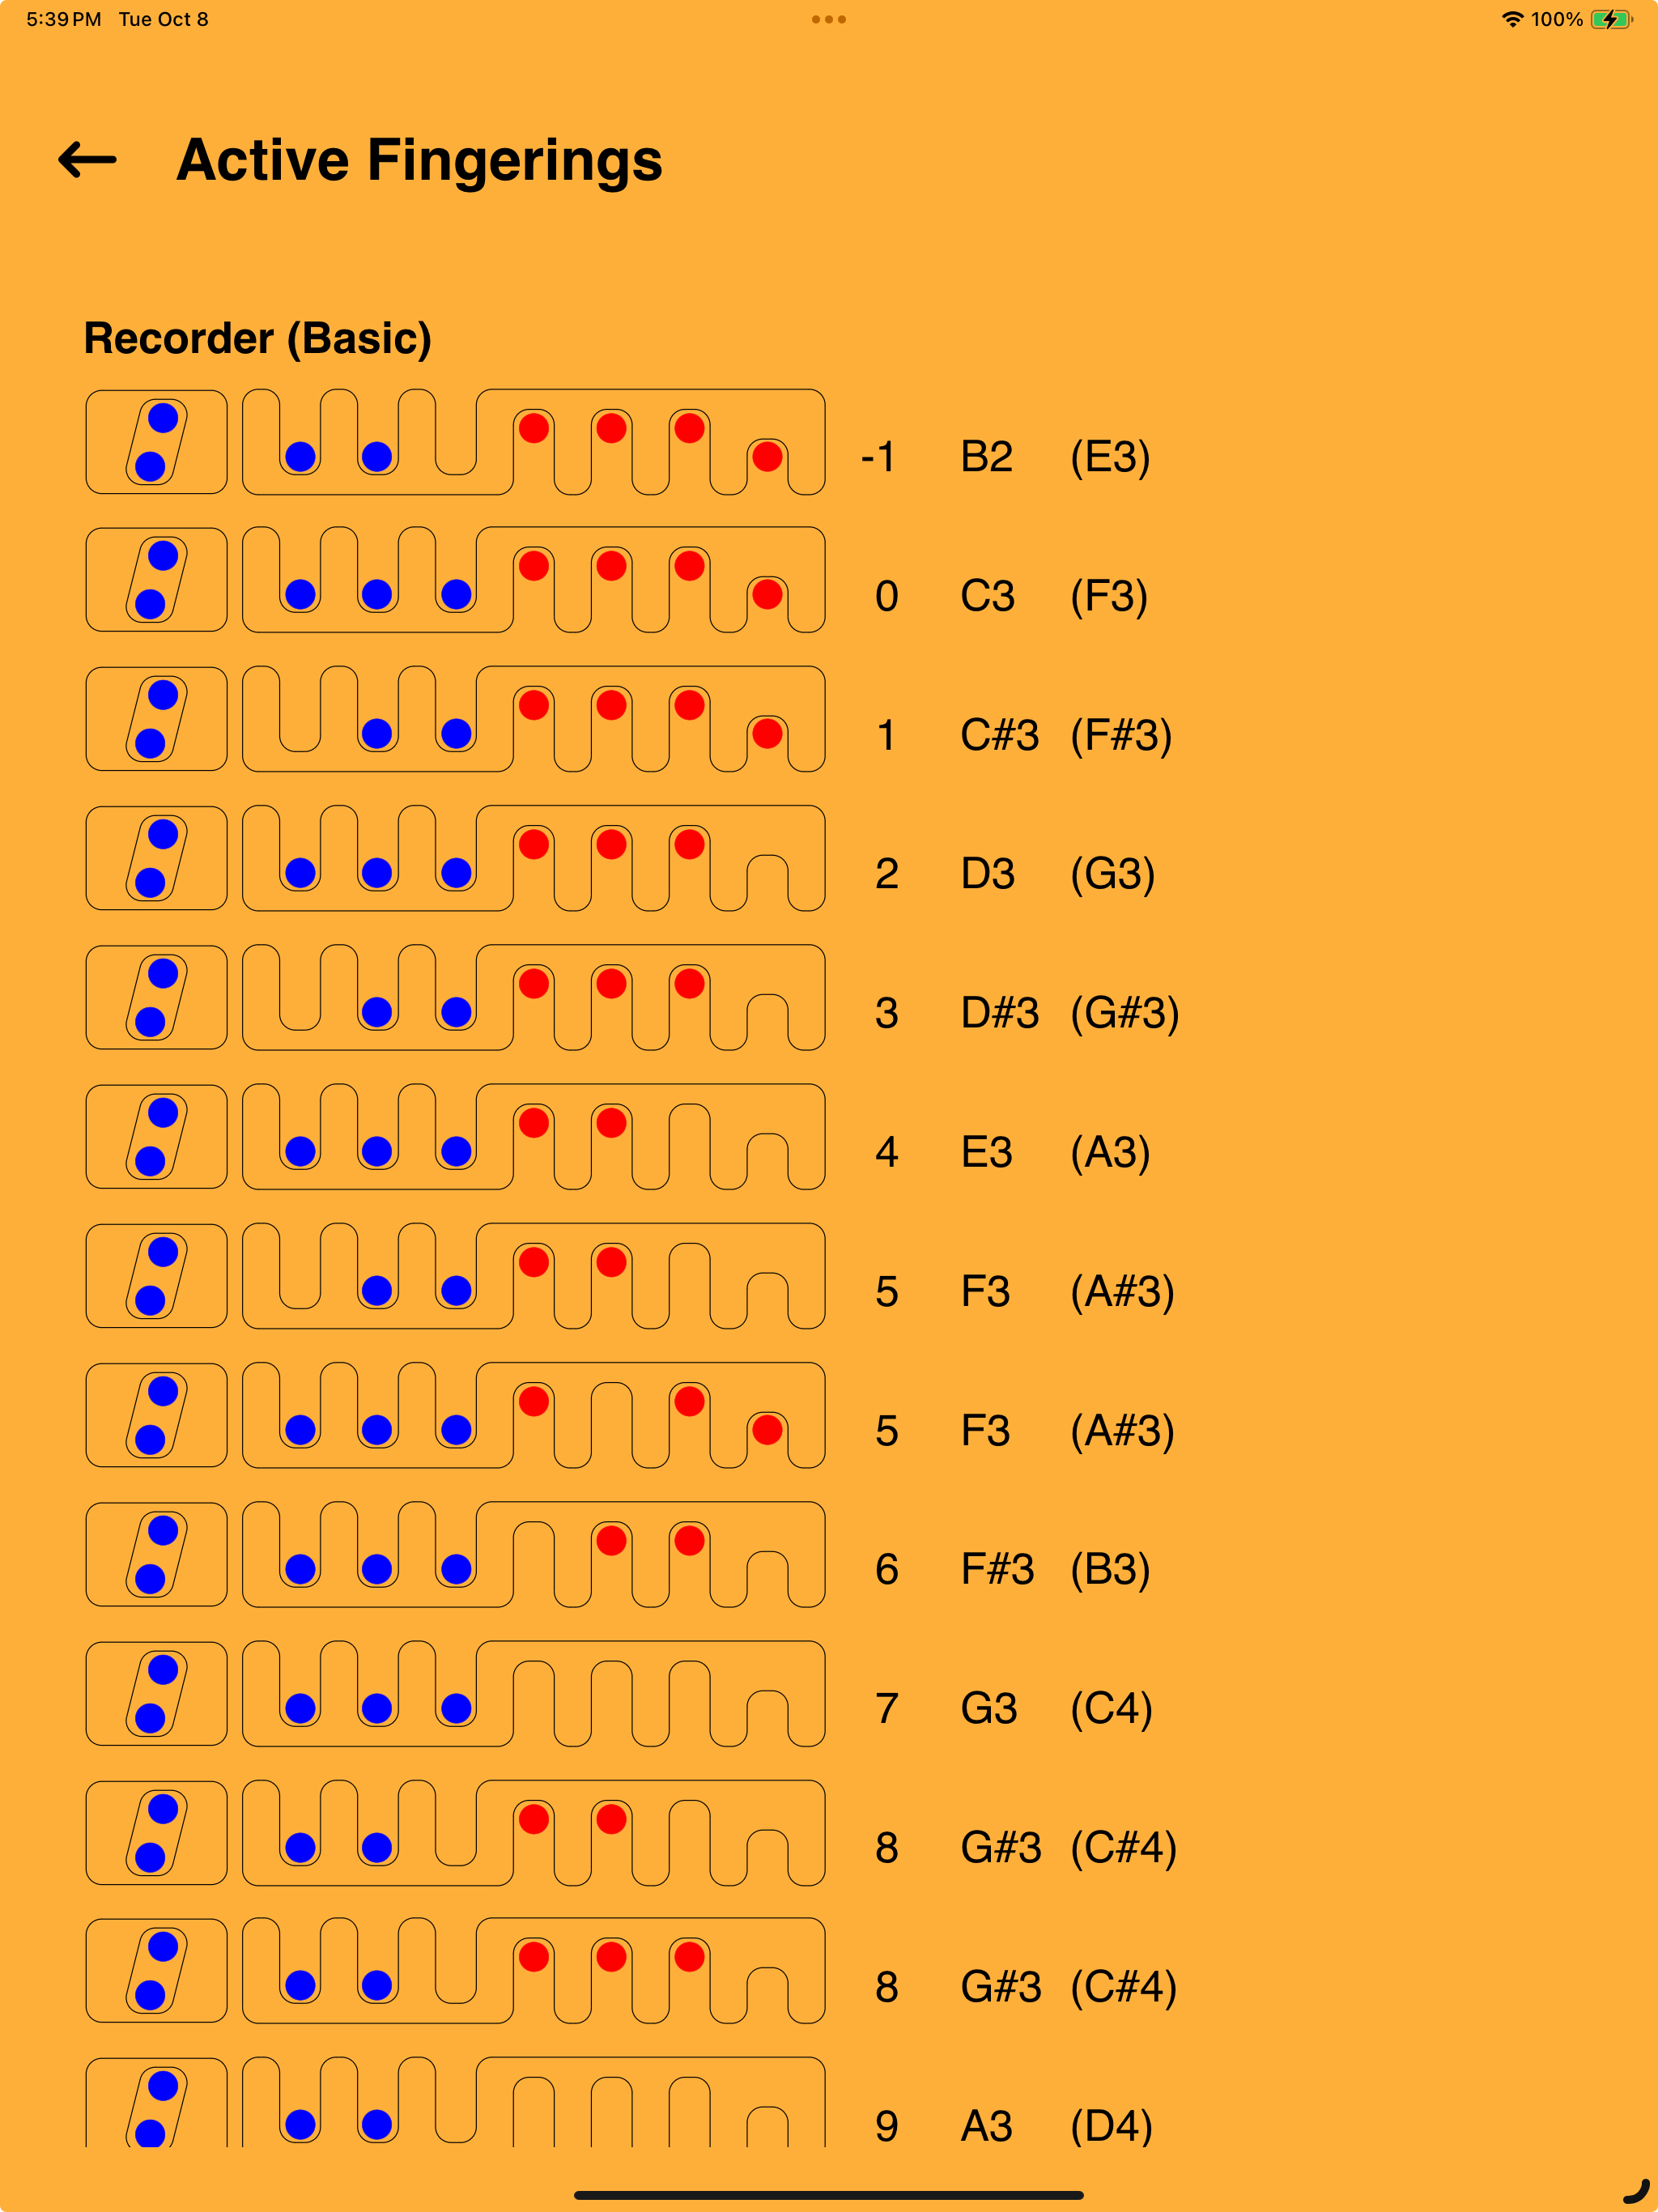
Active Fingerings
To look up the fingering for any note in the currently active fingering system, select Active Fingerings. Fingerings are displayed as they would be seen in the Touch Display, with the thumb and fingers of the left hand in blue and the thumb and fingers of the right hand in red. The number to the right is the offset in semitones from the base pitch of the instrument. The first pitch indicates the output for C fingering (with no transpositions), and the second pitch, in parentheses, indicates the output for F fingering. Since all the fingerings don’t fit on one screen, the fingerings display is scrollable.
In the macOS version of Zoot Link, you can open a separate reference window to show the currently active fingerings. Simply select Show Active Fingerings (Command-F) from the app’s menubar. To export the current fingerings to a PDF document, use Export Active Fingerings to PDF (Command-P). These features can be especially useful if you are developing your own custom fingering system.
Live Graphs & Breath Map
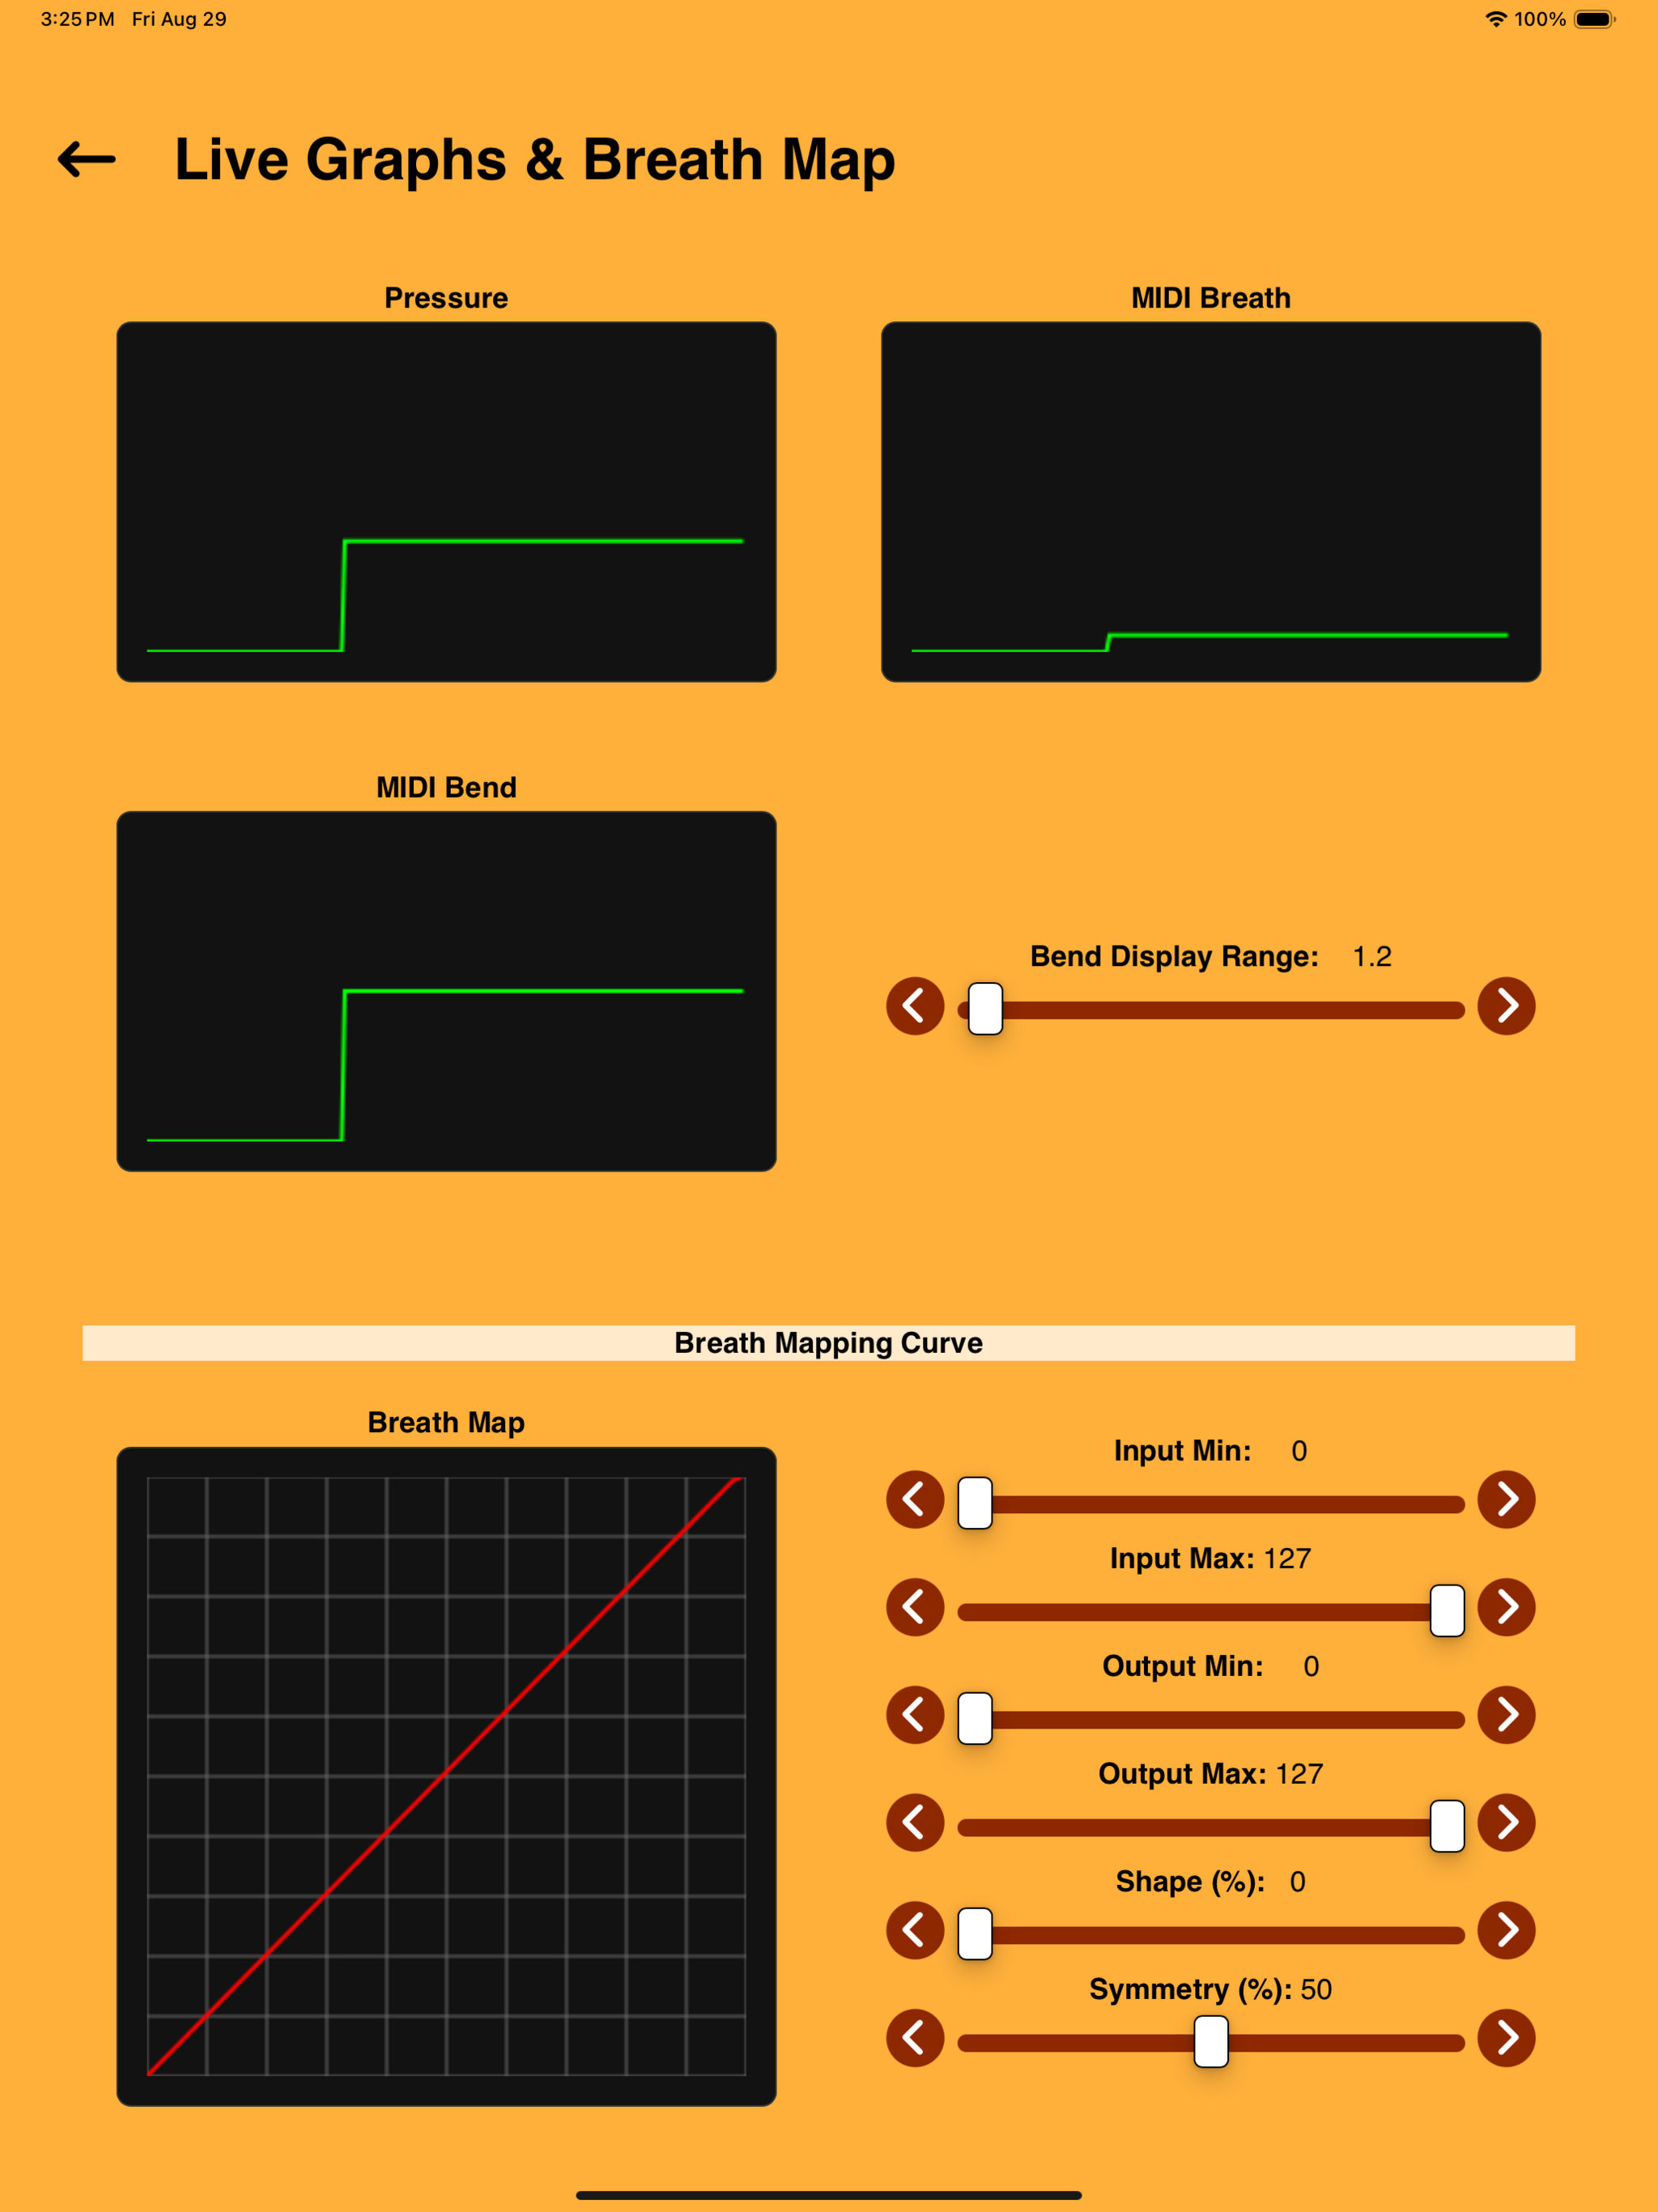
The live graphs provide real-time, oscilloscope-like displays of the raw Pressure data (positive and negative), the mapped MIDI Breath value, and the MIDI Bend value. The MIDI Bend Range slider gives you control over the sensitivity of the MIDI Bend display.
The Breath Mapping Curve lets you customize how input breath pressure (on the X-axis) maps to output MIDI Breath value (on the Y-axis). By default, the transfer function is linear with unity slope (1:1). As an example of a simple effect you can achieve with breath mapping, you might want to make the instrument more sensitive to breath; that is, to require less breath pressure for the same output amplitude. You can do this by lowering the Input Max slider to increase the slope of the transfer function. (If desired, this mapping change could be combined with a modification of the resistance tube to pass an increased volume of air at lower breath pressure.)
By adjusting the Shape slider, you can specify a non-linear mapping. As you increase the shape value, the curve becomes an S-shape (sigmoid) of increasing steepness. Symmetry varies the point at which the transition to the more linear part of the sigmoid occurs.
Besides allowing you to better match the breath response of an external virtual instrument, the breath mapping curve allows you to experiment with special effects. For example, if you wanted to easily play some kind of plucked instrument, you could set up a curve such that any breath input above a threshold produced the maximum output. You can also use the mapping curve to force continuous breath output, making it possible to play a virtual instrument without using your breath at all.
Presets
A preset saves the state of all the app’s controls, such as fingering system, transposition, gesture thresholds, etc. in a persistent file. The Presets page displays the available presets. The preset designated as [Default] is the one that will be automatically loaded by Zoot Link when it starts. If a control has been changed since the current preset was loaded, it will be marked by a red star (*).
The preset named Factory is built in and cannot be deleted, edited, or renamed.
To create a new preset, press New. The new preset will initially be called “Untitled,” so press Rename to give it a more meaningful label. Pressing Save writes the preset to a file so that you can reload it at a future time.
Use Set Default to tell Zoot Link that you want the currently selected preset to be loaded automatically when the app starts.
Finally, press Delete to remove a preset you no longer need.
Note: When the app is upgraded, presets will be marked as edited until you re-save them. This allows you to safely migrate old presets to new versions of the app which might have additional controls. Please contact us for additional guidance.
MIDI
A detailed explanation of how MIDI works is beyond the scope of this guide, but there are many good tutorials freely available online. If you need help with Zoot-specific technical questions, please feel free to contact us.
The MIDI Mapping controls allow you to customize the MIDI messages sent for breath pressure and motion sensing. For each parameter, the Message selector allows you to set the message type (MIDI status byte) or to disable the sending of a particular parameter by selecting None. For control-change (CC) messages, you also set the CC Number. For CC numbers below 32, Zoot sends 14-bit values, but often you only need the most significant 7 bits.
Breath Pressure is a unipolar value, ranging from 0 to 127 for the most significant 7 bits. The value sent for a given pressure is affected by any added Sway Tremolo and the transfer function implemented by the Breath Mapping Curve.
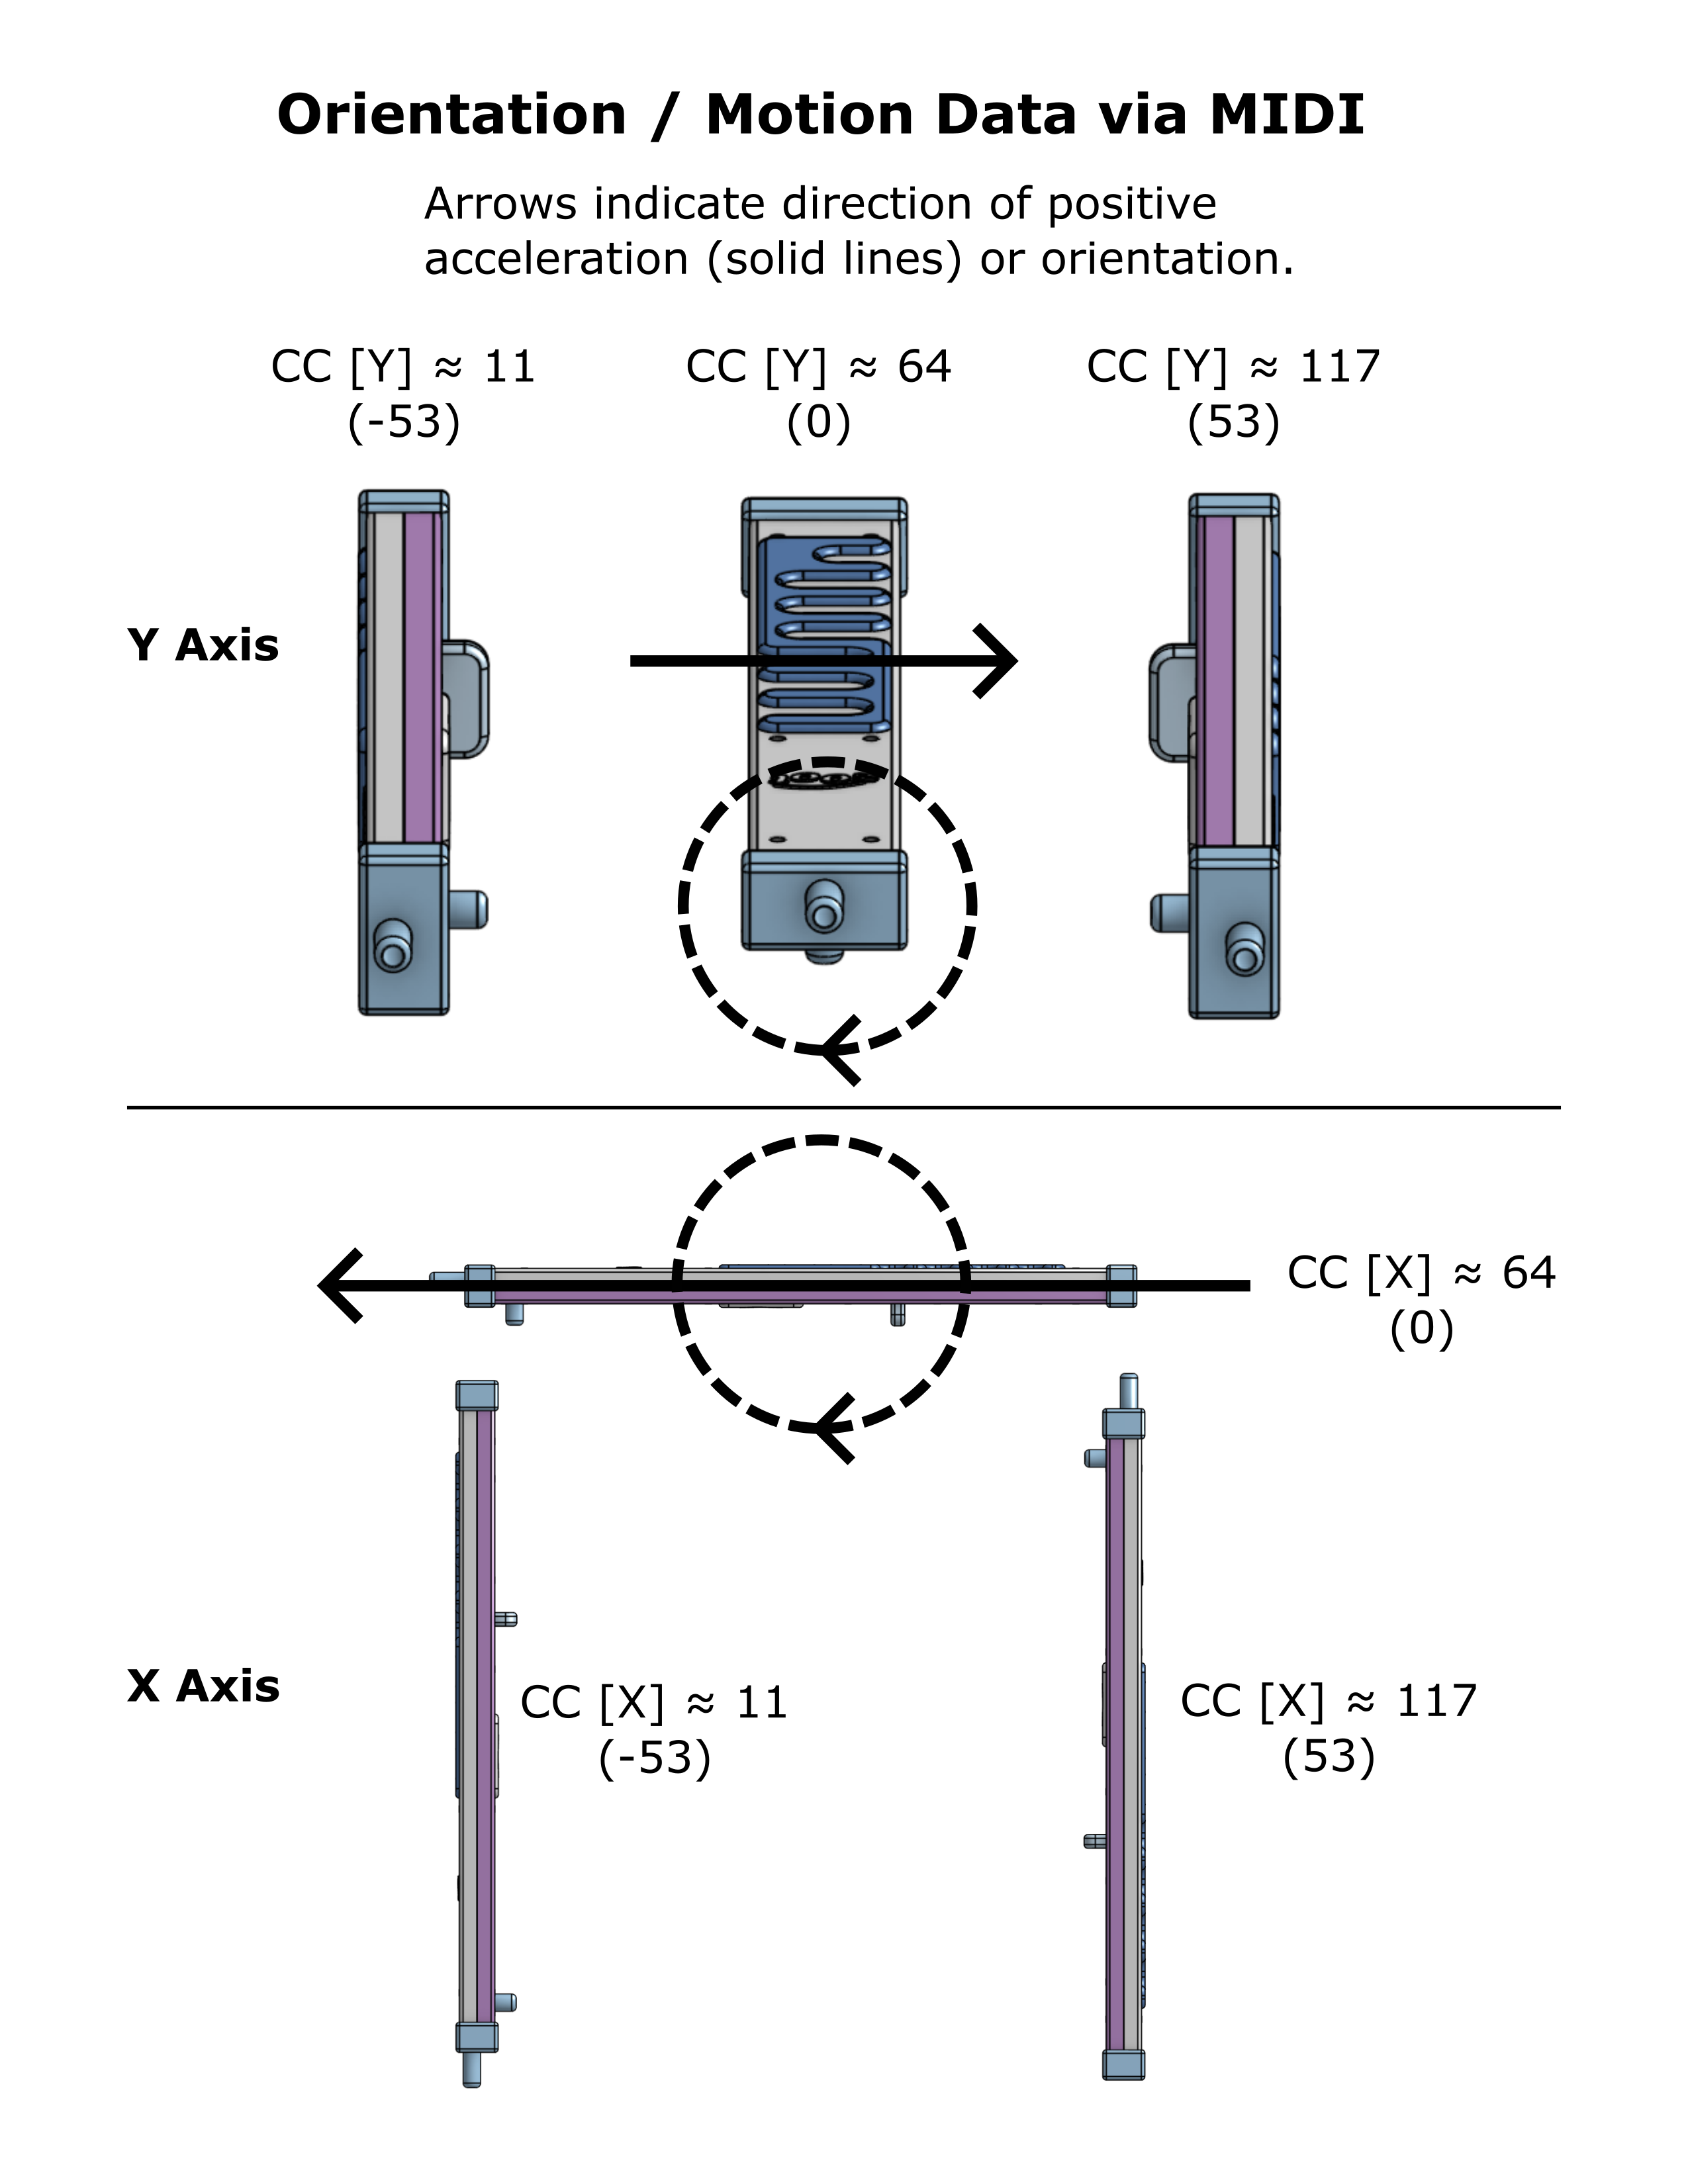
Motion Sense gives you independent access to Zoot’s X-, Y-, and Z-axis accelerometer values as bipolar data (positive and negative offsets) as shown in the diagram. Considering only the most significant 7 bits, the maximum accelerometer value due to gravity only (that is, measuring orientation without acceleration) is approximately 53 counts. Since this can be positive or negative, the accelerometer value is summed with 64 before sending. In other words, 64 represents the 0 value. High acceleration values are clamped to avoid overflow or underflow.
For Zoot’s built-in gestures, the X-axis value is used to measure tilt for the octave sensor as well as motion for strumming, and the Y-axis value is used to control pitch bending for vibrato.
Note that if Sway / Roll is enabled on the Gestures page, Zoot Link sends the Y-axis data as Pitch Bend, with the value sent affected by the Sway Bend Gain slider. You may want to turn off Sway / Roll if you handle the accelerometer data separately. (A future version of Zoot Link may include a feature to allow the use of customizable transfer functions mapping the values reported by the motion sensors to MIDI values. For now this can be set by some virtual instruments or in a separate app.)
The MIDI Deglitching Parameters can improve Zoot’s performance when playing various kinds of external synthesizers.
Key Delay allows you to reduce the spurious “intermediate” notes that can occur when you have to lift or put down multiple fingers to change pitches. Values of key delay greater than zero wait for multiple sensor samples to match before the changed fingering is considered valid. The disadvantage of this deglitching filter, of course, is that it adds a sample delay, reducing how fast you can ultimately play. In the current implementation, the sampling interval for finger sensors is 15 milliseconds, so a key delay of 1 sample corresponds to 15 ms.
Legato Overlap causes MIDI note-off messages to extend beyond the beginning of the following note (note-on) for the specified time interval when playing a legato passage; that is, when the breath is not stopped between the change in pitches. This overlap is required to achieve the desired result on some external synthesizers. It has no noticeable effect on Zoot’s built-in clarinet.
MIDI Pitch Bend Range sets the offset, in semitones, corresponding to the maximum MIDI value of pitch bend. Generally, this should match the range specified by your external MIDI instrument. The default range is set to 2 semitones, as this is also the default for many virtual instruments.
The MIDI bend range also limits the maximum pitch offset of a finger bend, including that for the built-in clarinet. If you are using the Recorder (Basic) fingering system, you may want to increase MIDI Pitch Bend Range to 4 to enable smooth transitions for those cases where the position of a single finger can move the pitch by that many semitones.
Advanced Gestures
The Glides (Portamento) section lets you trigger continuous pitch glides between notes. When Glide Mode is set to Sensor, gliding will only be enabled when you roll the instrument (rotate it about its long axis) to the left (counterlockwise). When the mode is Always, any legato transition (a transition without a break between notes), will trigger a glide.
Based on the Slope Factor, glides can be set to take place in constant time, regardless of the interval between the starting pitch and the ending pitch, or to have a constant slope, or to something in between. For example, if you set Octave Time to 0.20 (seconds) and Slope Factor to 0, all glides complete in 0.20 seconds, regardless of the pitch interval; bigger pitch intervals cause the pitch to change faster. With the same octave time but a Slope Factor of 1, the rate of change of pitch will be fixed at one octave in 0.20 seconds regardless of the pitch interval, so gliding over bigger intervals will take longer. Intermediate settings of Slope Factor interpolate between these extremes.
The Glissandos (Stepwise) section controls automatic stepwise pitch changes, currently limited to the notes of the major scale. When Gliss Mode is set to Sensor, glissing will only be enabled when you roll the instrument (rotate it about its long axis) to the right (clockwise). When the mode is Always, any legato transition (a transition without a break between notes), will trigger a gliss.
Turning on Proximity Mode disables the normal fingering system and causes the pitch of the instrument to be set by the proximity of your fingers for a theremin-like effect, where pitch is not restricted to the usual semitone steps. Fingers Used sets how many sensors are taken into consideration, counting up from the right pinky finger. Base Pitch is the MIDI number of the pitch produced when none of the measured fingers are near their sensor. Pitch Range sets the number of semitones added to the base pitch when all measured fingers are pressing against their sensors. Pitch Range can be positive or negative; that is, you can decide whether to make the pitch go up or down when you move your fingers closer.
Turning on Tilt Mode disables the normal fingering system and causes the pitch of the instrument to be set by the angle at which you hold the instrument, similar to Proximity Mode. In this case, Base Pitch is the MIDI number of the pitch produced when the instrument is tilted all the way down (roughly 45 degrees below the horizontal), and Pitch Range sets the number of semitones added to the base pitch when the instrument is tilted all the way up (roughly 45 degrees above the horizontal). As for proximity, Pitch Range for tilt can be positive or negative; that is, you can decide whether to make the pitch go up or down when you tilt the instrument up.
Internal Synth
Currently, Zoot Link includes two internal synthesizers (software-based virtual instruments): a physically modeled clarinet and a sine generator with adjustable skew.
Tuning lets you adjust the overall pitch of the referenced synth so you can play with acoustic instruments that are not tuned to standard concert pitch (A4 = 440 Hz). You can shift the pitch two semitones (200 cents) in either direction.
Output Level changes the overall volume of the referenced synth. This can be useful if you are playing with another audio source on your laptop or tablet and need to adjust the mix.
Skew adjusts the level of distortion applied to the sine generator; the greater the skew, the more energy in the wave’s harmonics and the buzzier the sound.
Sip Sensor
Note: This feature is experimental and intended for advanced users. For assistance or detailed information beyond the description provided here, please contact technical support.
Normally, Zoot’s pressure sensor is used to measure how hard you blow into the mouthpiece, and this value typically controls the loudness and timbre of a virtual instrument. However, the same sensor can also detect negative pressure, or suction. By deliberately sucking in, referred to as taking a sip, you can trigger one or more actions in Zoot Link’s user interface or send MIDI messages. Different sip actions can be selected according to the user’s fingering (which fingers are down or which finger sensors are active) at the time of the sip.
Sip Actions Group selects a particular mapping of fingerings to sip actions, which is shown in the table below the selector. Several sample actions groups are supplied with Zoot Link, but you can also create your own.
In the default Factory preset, the None actions group is selected, and a sip produces no action at all.
In the Sample 1 actions group, a sip with no fingers down forces a calibration, just like pushing the Calibrate button. A sip with all fingers down is like pushing the Restore Pitch Defaults button.
The Sample 2 group shows actions that increment or decrement the amount of pitch shift and two that send MIDI commands. One possible use of MIDI commands is to trigger actions in other music-related programs; for example, these could be used to trigger “next page” and “previous page” in forScore, a program to display sheet music.
Sip Trigger adjusts how much suction is required to trigger the action associated with the sip sensor. Increase this value if you notice false positives (that is, the action triggers when you did not intend it), or decrease it if you find the action requires too much suction to trigger. Note that tonguing the sip creates a stronger signal that will more easily trip the sensor.
Software updates
The Zoot system is designed so that improvements can be made and features added simply by updating the Zoot Link app. If necessary, the firmware in the instrument itself can also be updated via the built-in USB-C receptacle. We welcome your input regarding what new features you’d like to see.
Future developments under consideration include:
- Graphical display of finger proximity data
- More predefined fingering systems
- Graphical editor for custom fingering systems
- More predefined strummer chords and chord groups
- Graphical editor for strummer chords and chord groups
- Customizable transfer functions mapping sensor values to MIDI output
- A collection of built-in sampled instruments
- Implementation of a second thumb sensor not currently used
- Access to internal parameters of the clarinet synth
- More breath and motion gestures
- More physically modeled virtual instruments
Battery replacement
Zoot’s internal lithium-polymer battery is designed to last for the life of the instrument, but it can be replaced if necessary. Please contact us for instructions.
Troubleshooting
If you can’t find an answer to your question after reading this Zoot User Guide and checking the Frequently Asked Questions on the Zoot website, you can send a message to technical support via the website or by email to support@playzoot.com.
Warranty
Computing Explorations, LLC provides this 1-Year Warranty (“Warranty”) for your Zoot electronic wind instrument (“Instrument”). This Warranty covers defects in materials and workmanship for one year from the date of purchase. It does not cover damage due to abuse, misuse, accidents, or unauthorized repairs.
During the warranty period, we will either repair or replace the Instrument if it exhibits defects in materials or workmanship. We will choose between repair or replacement based on the nature of the defect.
You are responsible for shipping the Instrument to us for warranty service. We will cover the return shipping costs for repaired or replaced Instruments within the continental United States. Outside the continental U.S., you will be responsible for all shipping costs.
Please contact us to make a warranty claim.