Zoot Quick Start
Zoot™ is an easy-to-play yet highly expressive electronic wind instrument. The device that you hold in your hands and blow into doesn’t make any sounds on its own; instead, Zoot Link, the instrument’s free companion app for iPhone, iPad, or MacBook, interprets Zoot’s sensor data to make music. Zoot Link includes a high quality, physically modeled virtual clarinet which also accepts MIDI input.
If you’re reading this guide online, click or tap the images for a better view.
Install Zoot Link app
To get started, first install Zoot Link on your device. For iOS or iPadOS, you get the app from the App Store. If you want to use Zoot with a MacBook, please download the macOS app from the Zoot website.
When you open Zoot Link for the first time, a system message will pop up requesting permission to use Bluetooth, which is required to receive sensor data from Zoot.
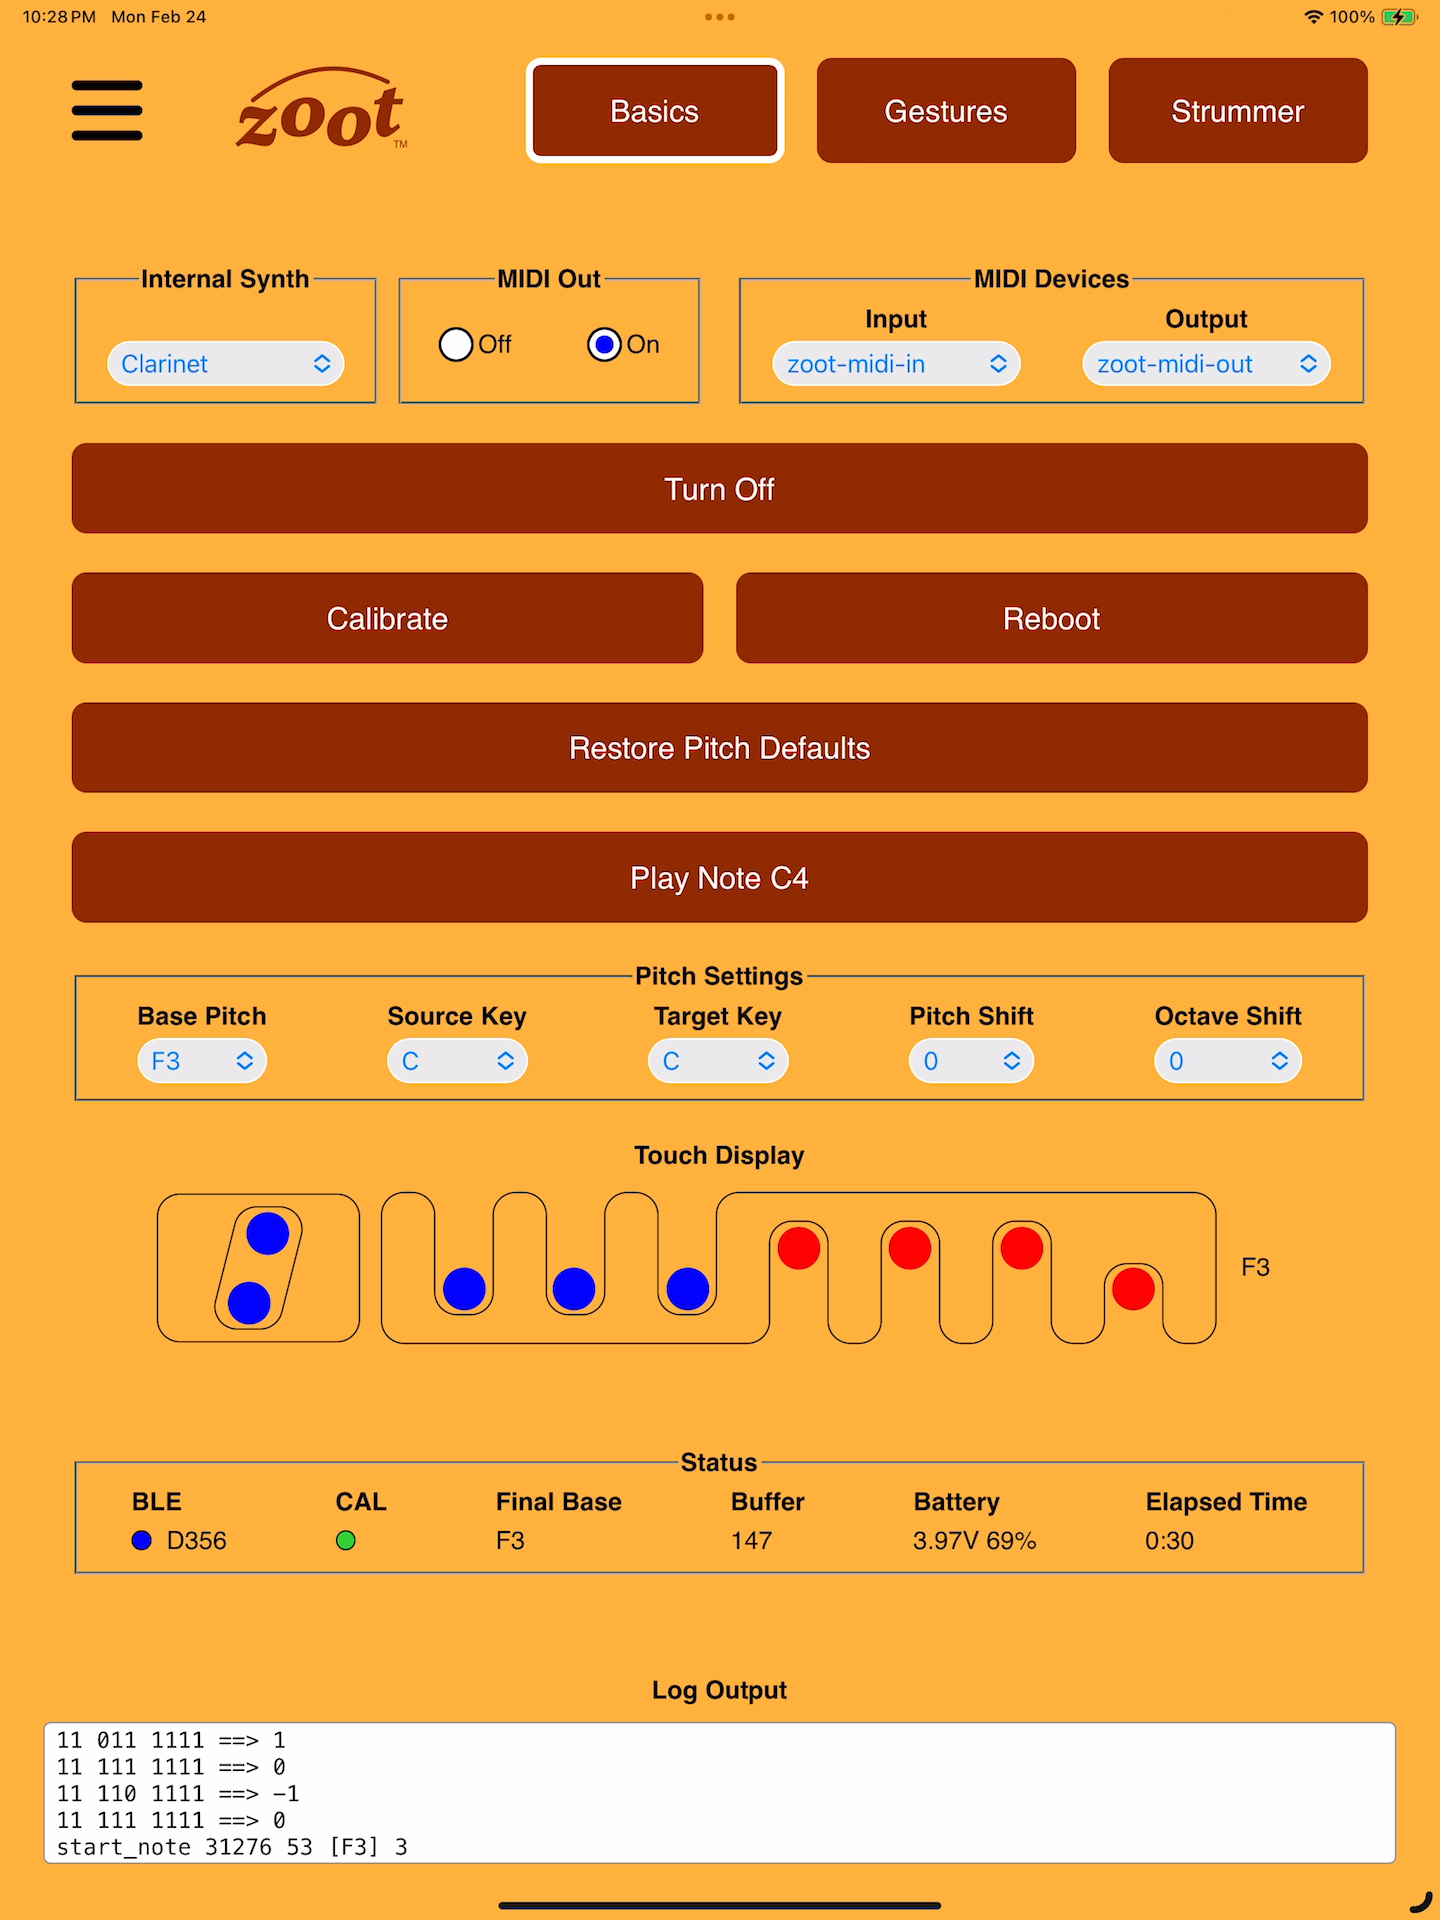
Power On

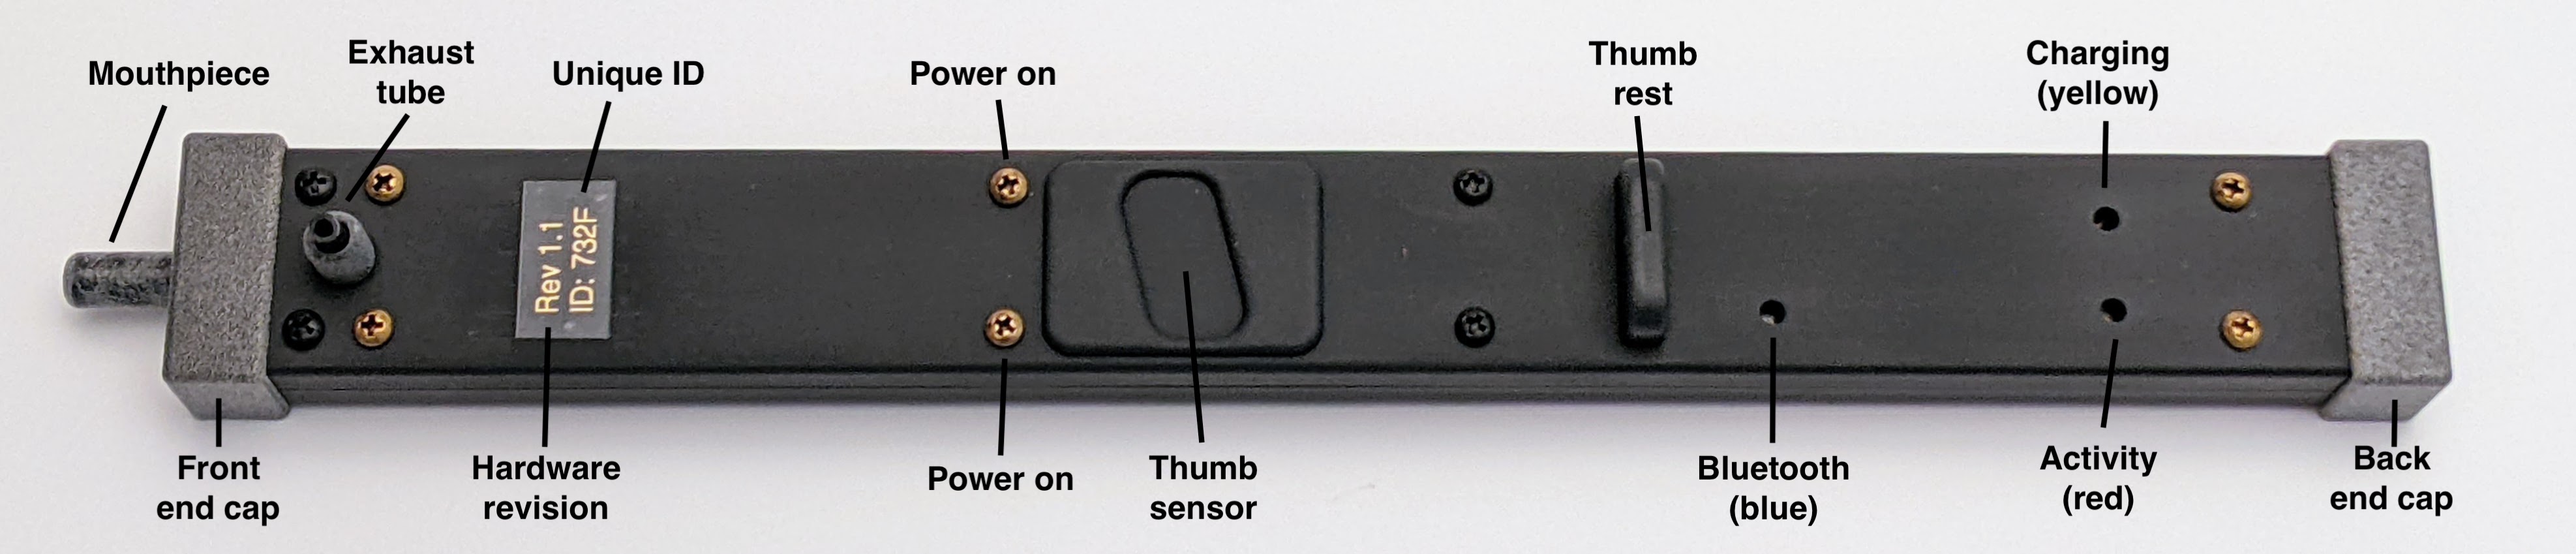
Turn on your Zoot by touching the brass screws (power on) in the center of the instrument. You can touch the two screws on Zoot’s top side, the two screws on its underside, or all four at once. You’ll know that Zoot is on when you see the blue and red LEDs on Zoot’s underside light up.
Pair Bluetooth
To use Zoot with its app for the first time, you have to pair it with your smart device. Turn on Bluetooth and open the Bluetooth settings. You should see “Zoot XXXX” show up in “Other Devices” or “Nearby Devices,” where “XXXX” represents your Zoot’s unique identifier (shown on the label on Zoot’s underside). Select your Zoot and accept the request to pair it with your phone, tablet, or computer.
Once Zoot has been paired with your smart device, Zoot Link will automatically connect to your Zoot. In the Status section, the BLE indicator shows if Bluetooth Low Energy data is being received, and the CAL indicator shows whether Zoot has completed a calibration cycle.
Place Fingers
Hold Zoot the way you would a soprano recorder. Start with the middle, ring, and index fingers of the left hand placed on the left-hand sensors, the thumb of the thumb of the left hand covering both halves of the thumb sensor, and the index, middle, ring, and pinky fingers covering the right-hand sensors, and your right thumb under the the thumb rest to support the instrument. You should see corresponding blue and red dots appear on the app’s Touch Display.
If you don’t see all the finger sensors lighting up on the Touch Display, either your fingers aren’t covering the sensors sufficiently, or you were touching one or more sensors during the calibration cycle. You can always force a calibration by pressing the Calibrate button in the app. Hold the Zoot by its edges when you calibrate (or when you turn it on) so your fingers are not touching any of the sensors.
Blow Notes
Blow into the mouthpiece to play a note on the built-in virtual clarinet. As you vary your breath pressure, notice how the sound changes in both loudness and timbre.
Choose Fingering System
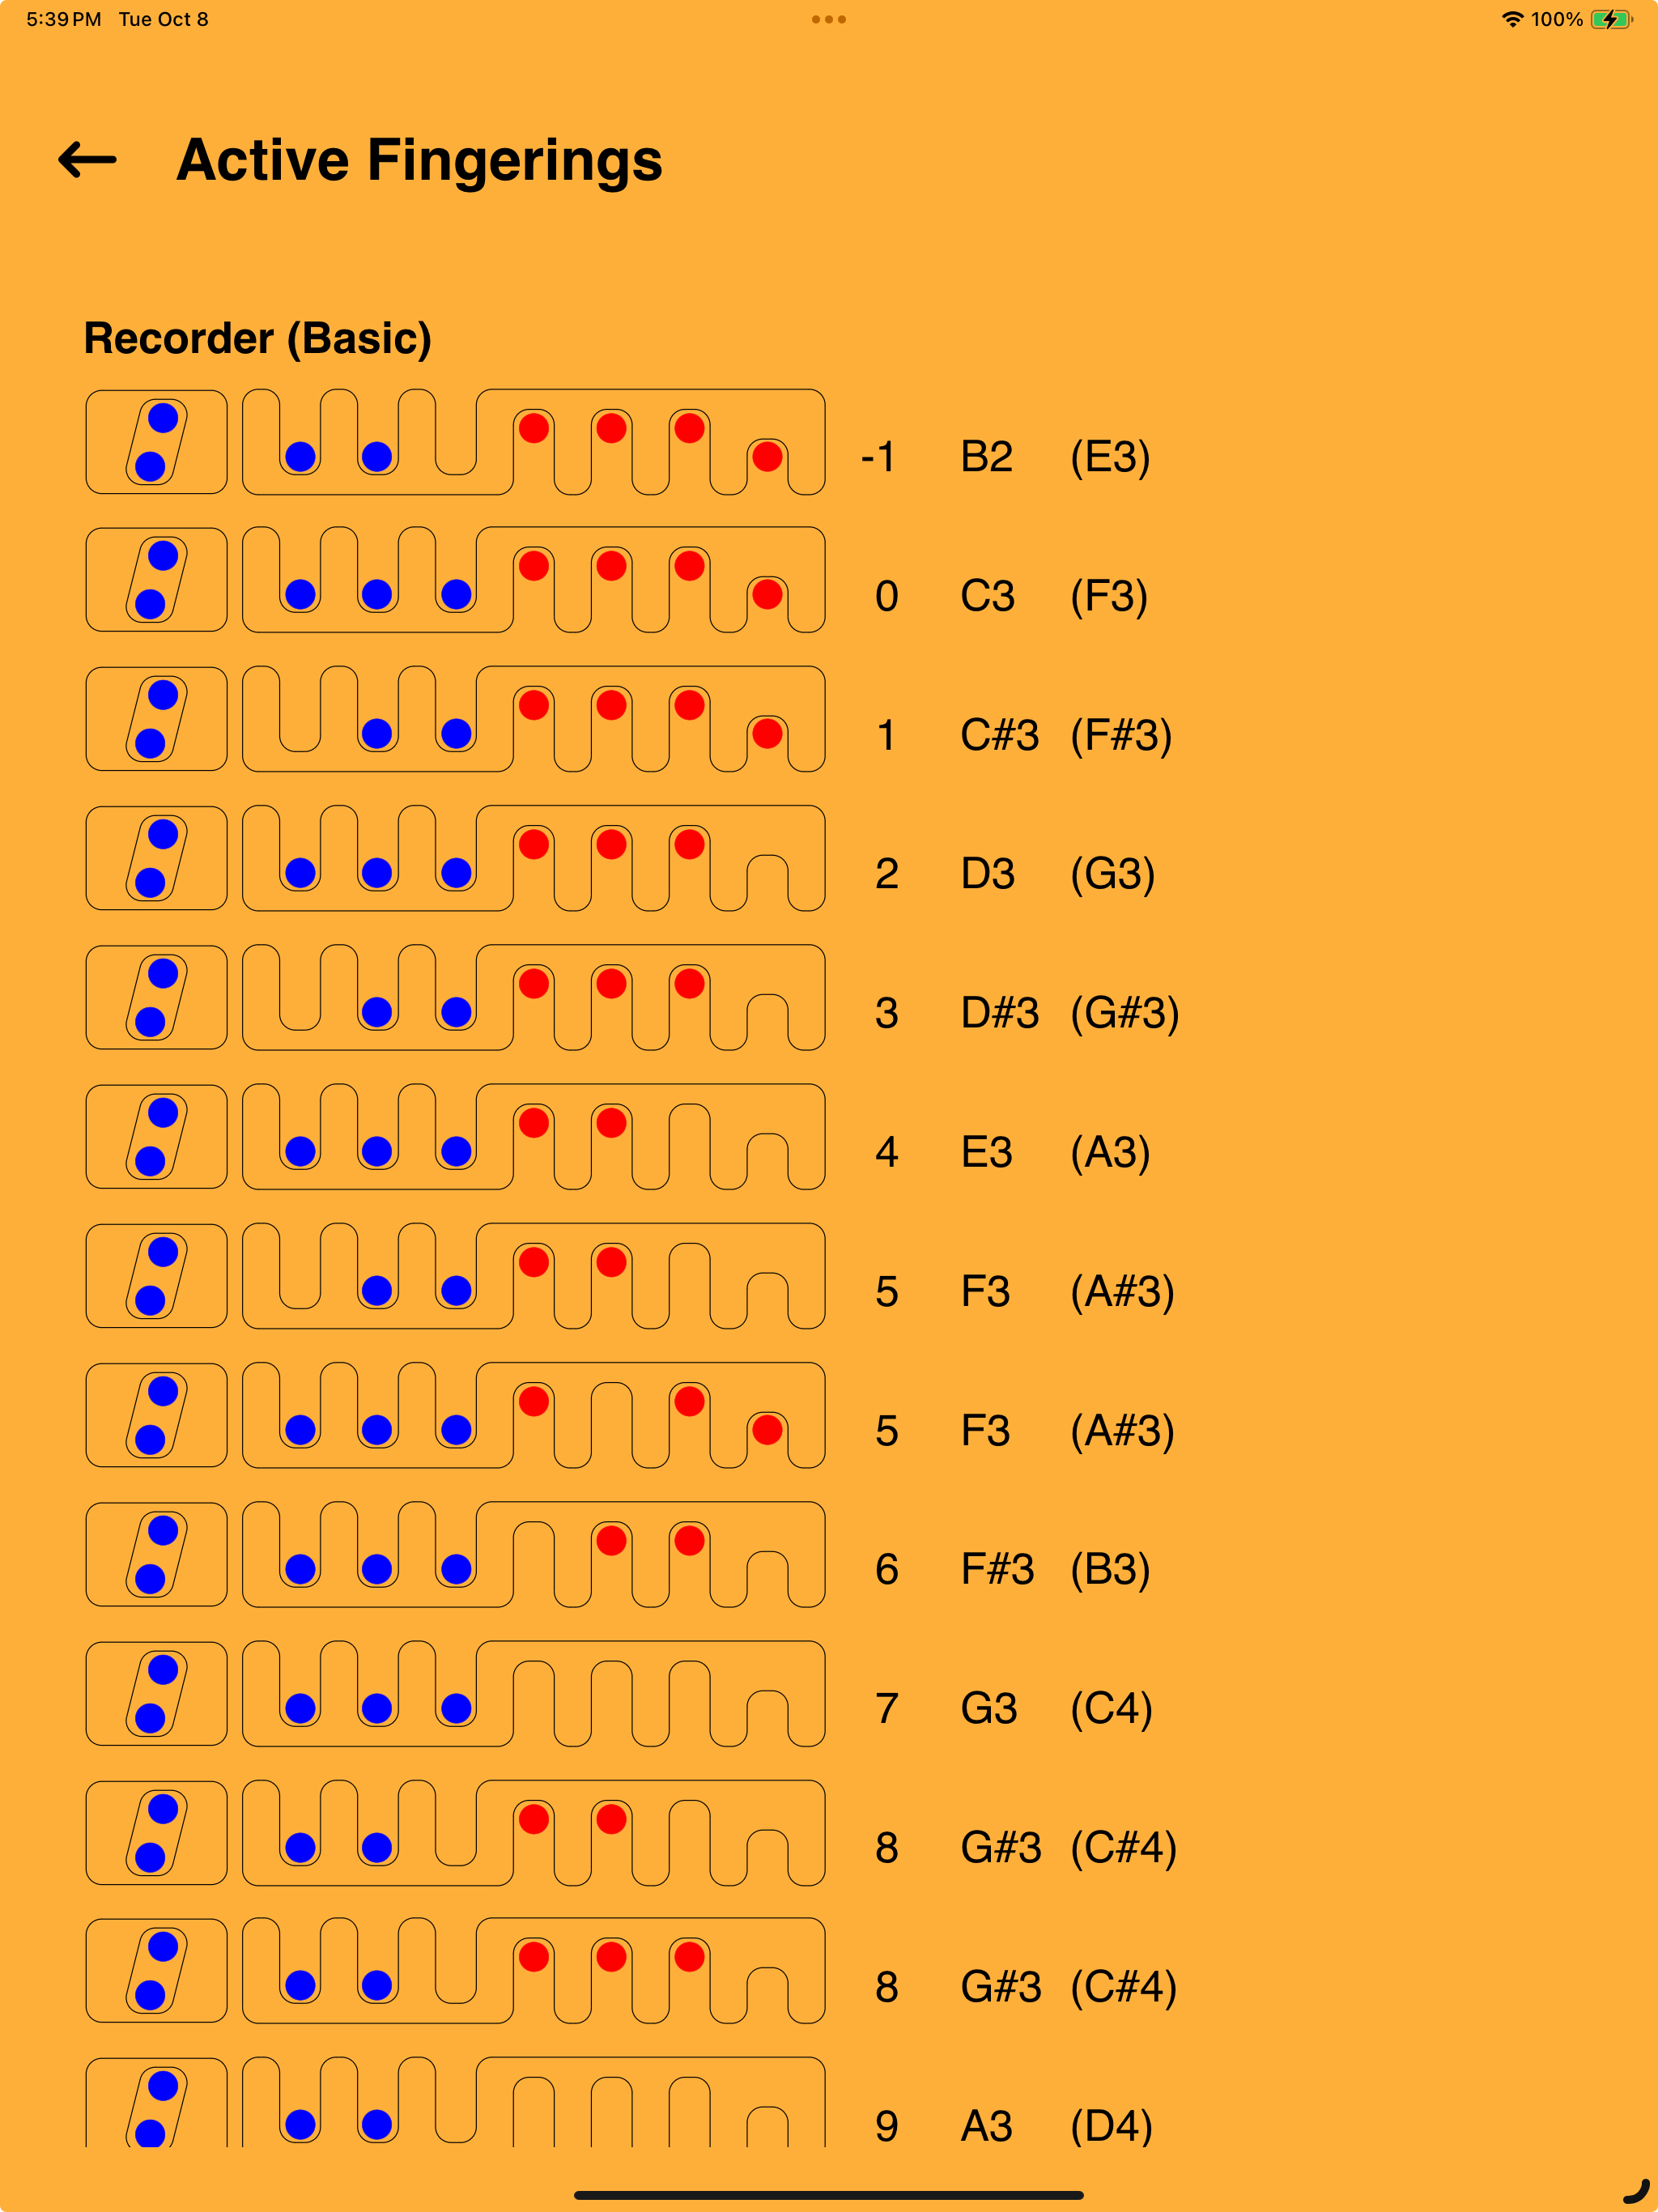
By default, Zoot uses baroque recorder fingerings, but you can select other options, including Simple (Four Octaves) on the Gestures screen. You can always access Active Fingerings from the bars menu at the top left of the screen.
Connect Audio Output
You can use Zoot with your smart device’s built-in speaker, with headphones or earbuds, or with an external speaker. Be aware that external Bluetooth speakers introduce a significant audio delay, and are not suitable for playing Zoot. For more information regarding external speakers, please see the Zoot User Guide.
Turn Off
Zoot turns off automatically if it sits still for two minutes, if you hold it vertically with mouthpiece facing down for two seconds, or if you press Turn Off while it’s connected to the app.
Charge Battery
Zoot contains an internal lithium-polymer battery that can last for nearly ten hours of playing on a full charge. The battery’s state of charge is displayed in the Status section of the app.
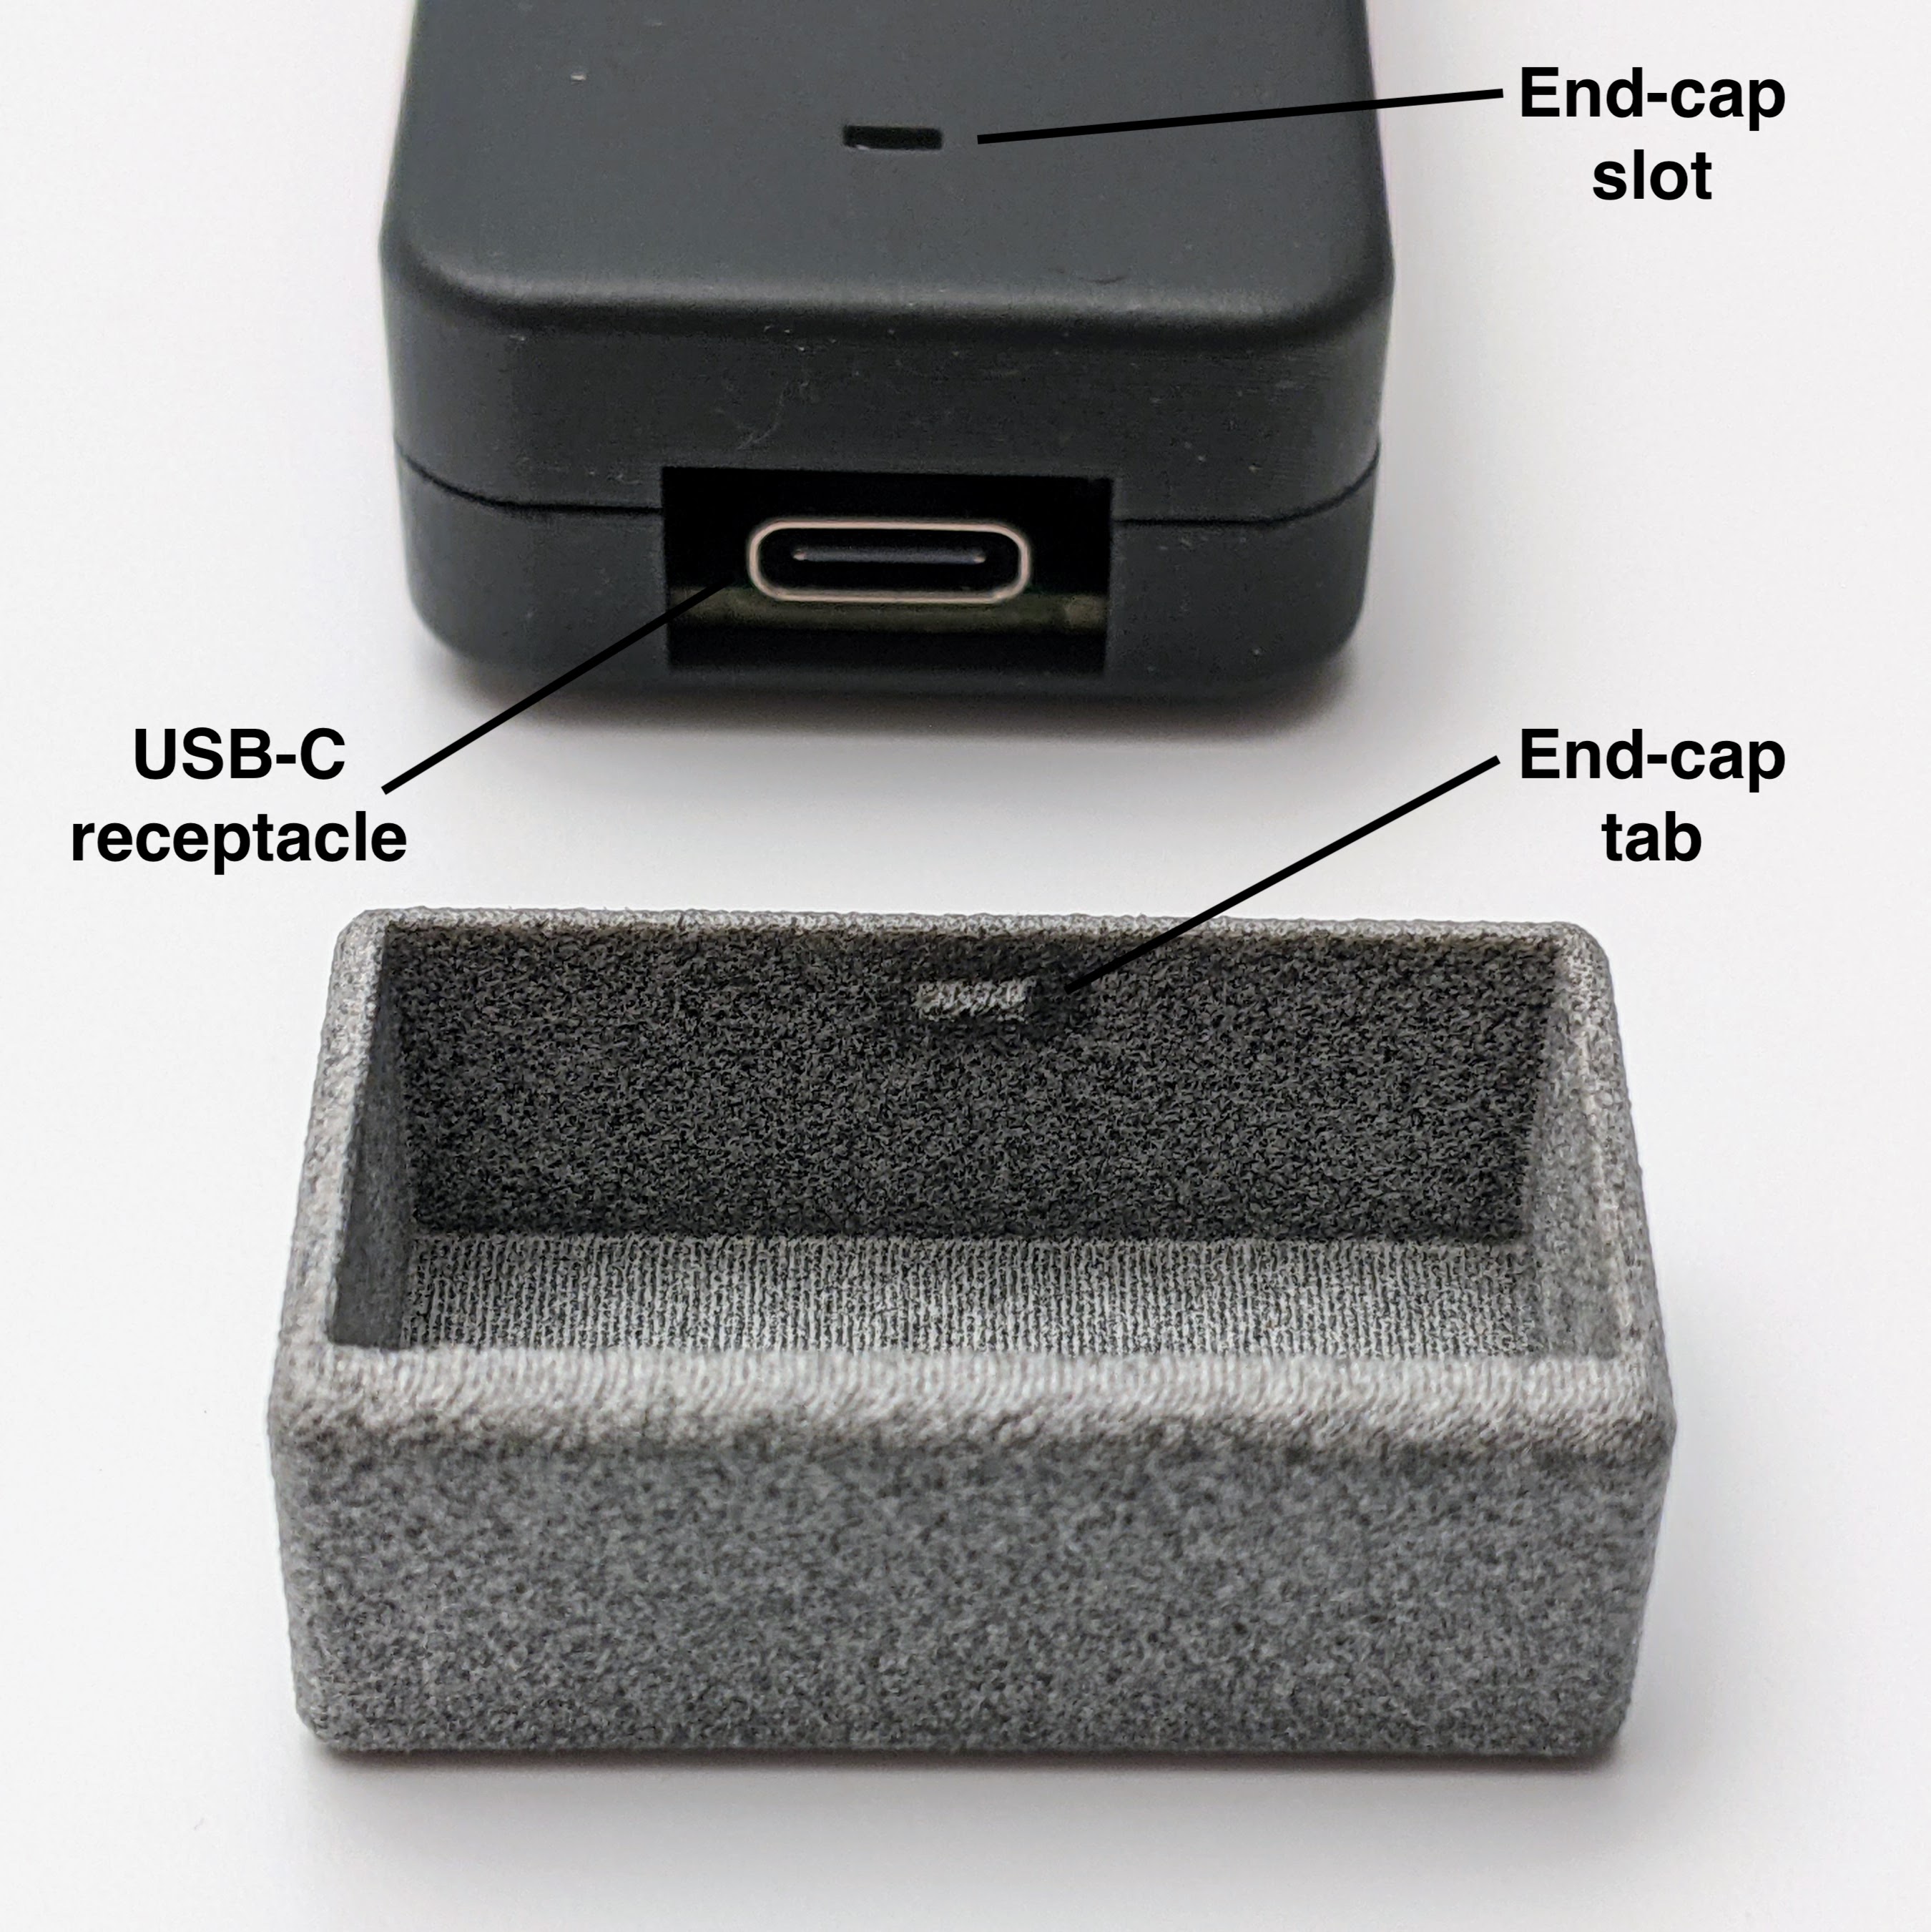
To charge the battery, first remove the back end cap by pulling firmly. (Pushing down with your thumb on the underside of Zoot near the end cap to release the end cap-tab makes it easier to pull the cap off.) With the cap off, Zoot’s USB-C receptacle is exposed. Plug in a USB-C cable connected to a USB power source, and make sure the yellow charging LED turns on. When the battery has fully charged, the charging LED will turn off. Replace the end cap, noting how the end-cap tab snaps into the slot on the underside of Zoot.
Have Fun
For much more about Zoot’s capabilities and how to use the instrument, please see the Zoot User Guide and Zoot FAQ. If you run into trouble, you can send a message to technical support via the Zoot website or by email to support@playzoot.com.
Explore all that Zoot can do, and have fun making music!